|
|
||
|---|---|---|
| .. | ||
| callbacks | ||
| conf | ||
| data | ||
| evaluators | ||
| inference | ||
| loggers | ||
| models | ||
| scripts | ||
| training | ||
| triton | ||
| .dockerignore | ||
| .gitignore | ||
| Dockerfile | ||
| LICENSE | ||
| LICENSE AGREEMENT | ||
| NOTICE | ||
| README.md | ||
| TSPP_Architecture.png | ||
| criterion.py | ||
| distributed_utils.py | ||
| hp_search.py | ||
| launch_deployment.py | ||
| launch_inference.py | ||
| launch_optuna.py | ||
| launch_preproc.py | ||
| launch_tspp.py | ||
| optimizers.py | ||
| requirements.txt | ||
README.md
Time-Series Prediction Platform 1.0 for PyTorch
Time-series prediction is a common problem in multiple domains for various applications, including retail, industry, smart cities, and financial services. Research in the time-series field is growing exponentially, with hundreds of deep learning time-series forecasting paper submissions to ICML, ECML, ITISE, and multiple journals every year. However, there is currently no common framework to compare the accuracy and performance of all the models from the industry or academia.
Solution Overview
Time-Series Prediction Platform (TSPP) enables users to mix and match datasets and models. In this case, the user has complete control over the following settings, and can compare side-by-side results obtained from various solutions. These include:
- Evaluation metrics
- Evaluation datasets
- Prediction horizons
- Prediction sliding window sizes Model choice
- Model hyperparameters
Time-Series Prediction Platform architecture
The platform has the following architecture.
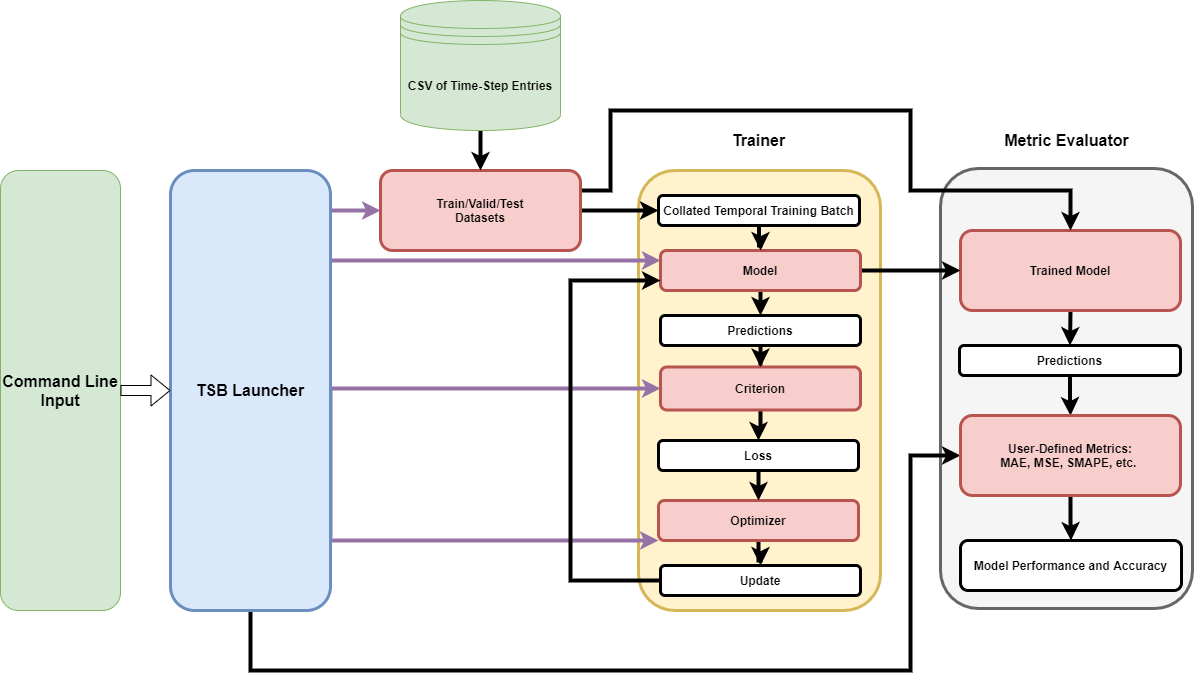 In the previous figure, the command line feeds input to the TSPP launcher, which uses said input to configure the components required to train and test the model.
The platform is designed to support multiple data types for input features, including the observed values of the forecasted time-series, known data supporting the forecasts (for example, day of the week), and static data (for example, user ID). This is summarized in the following figure.

Time-series data type
Default configuration
The TSPP utilizes the default configurations provided by each model for each accompanying dataset. More information on individual model configurations can be found within the respective model repositories. By default, Temporal Fusion Transformer (TFT) is included within the TSPP.
Models
- Temporal Fusion Transformer
- AutoARIMA
Feature support matrix
This tool supports the following features:
| Feature | Time-Series Prediction Platform |
|---|---|
| Automatic mixed precision (AMP) | Yes |
| Multi-GPU training with (PyTorch DDP) | Yes |
| [TorchScript, ONNX, and TRT conversion and NVIDIA Triton Deployment] | Yes |
Features
Automatic Mixed Precision (AMP)Automatic mixed precision is a mode of computation for PyTorch models that allows operations to use float16 operations instead of float32 operations, potentially accelerating selected operations and total model runtime. More information can be found under the Mixed precision training section.
Multi-GPU training with PyTorch Distributed Data Parallel (DDP)DDP is a mode of computation for PyTorch models that allows operations to be executed across multiple GPUs in parallel to accelerate computation.
TorchScript, ONNX, and TRT conversion and NVIDIA Triton Deployment refer to the conversion of a model to the aforementioned formats and the ability to deploy the resulting converted models to an NVIDIA Triton inference server. More detail about this process and native inference can be found in the Advanced tab under the Conversion, Deployment, and Inference subsection.
Mixed precision training
Mixed precision is the combined use of different numerical precisions in a computational method. Mixed precision training offers significant computational speedup by performing operations in half-precision format while storing minimal information in single-precision to retain as much information as possible in critical parts of the network. Since the introduction of Tensor Cores in NVIDIA Volta, and following with both the NVIDIA Turing and NVIDIA Ampere Architectures, significant training speedups are experienced by switching to mixed precision -- up to 3x overall speedup on the most arithmetically intense model architectures. Using mixed precision training requires two steps:
- Porting the model to use the FP16 data type where appropriate.
- Adding loss scaling to preserve small gradient values.
The ability to train deep learning networks with lower precision was introduced in the NVIDIA Pascal architecture and first supported in CUDA 8 in the NVIDIA Deep Learning SDK.
For information about:
- How to train using mixed precision, refer to the Mixed Precision Training paper and Training With Mixed Precision documentation.
- Techniques used for mixed precision training, refer to the Mixed-Precision Training of Deep Neural Networks blog.
- How to access and use AMP for PyTorch, refer to Torch-AMP guide.
Enabling mixed precision
Mixed precision can be enabled by specifying amp=True in the launch call. Note that for some cases, when the batch size is small, the overhead of scheduling kernels for mixed precision can be larger than the performance gain from using lower precision, effectively succeeding with lower throughput.
Setup
The following section lists the requirements that you need to meet in order to run the Time-Series Prediction Platform.
Requirements
This repository contains a Dockerfile that extends the PyTorch NGC container and encapsulates some dependencies. Aside from these dependencies, ensure you have the following components:
- NVIDIA Ampere Architecture, NVIDIA Volta or NVIDIA Turing based GPU
- Ubuntu 18.04
- NVIDIA Docker
- docker-compose. For an up-to-date version, installing from the web is recommended
- Custom Docker containers built for this model. Refer to the steps in the Quick Start Guide.
For more information about how to get started with NGC containers, refer to the following sections from the NVIDIA GPU Cloud Documentation and the Deep Learning Documentation:
For those unable to set up the required environment or create your own container, refer to the versioned NVIDIA Container Support Matrix.
Quick start guide
Getting Started
-
Create a dataset directory. The directory can be arbitrary, and it is recommended not to include it in the TimeSeriesPredictionPlatform directory. This arbitrary directory will be mounted to the TSPP container later. In the following steps this directory will be referred to as /your/datasets/.
-
Enter the Deep Learning Examples TSPP repository:
cd DeeplearningExamples/Tools/PyTorch/TimeSeriesPredictionPlatform
- Run repository setup
source scripts/setup.sh
- Build the docker image:
docker build -t tspp .
- Next we will start our container and mount the dataset directory, which means that /workspace/datasets/ points to /your/datasets/. Any changes made to this folder in the docker container are reflected in the original directory and vice versa. If we want to mount additional folders we can add ‘-v /path/on/local/:/path/in/container/’ to the run command. This will be useful if we want to save the outputs from training or inference once we close the container. To start the docker container:
docker run -it --gpus all --ipc=host --network=host -v /your/datasets/:/workspace/datasets/ tspp bash
- After running the previous command you will be placed inside the docker container in the /workspace directory. Inside the container, download either the electricity or traffic dataset:
python data/script_download_data.py --dataset {dataset_name} --output_dir /workspace/datasets/
The raw electricity dataset is the 15 minute electricity consumption of 370 customers from the UCI Electricity Load Diagrams. We aggregate to an hourly forecast and use the previous week to predict the following day. The raw traffic dataset is the 10 minute occupancy rate of San Francisco freeways from 440 sensors downloaded from the UCI PEMS-SF Data Set. We again aggregate to an hourly forecast and use the previous week to predict the following day.
- Preprocess the dataset:
python launch_preproc.py dataset={dataset}
- Launch the training, validation, and testing process using the temporal fusion transformer model:
python launch_tspp.py model=tft dataset={dataset} criterion=quantile
Outputs are stored in /workspace/outputs/{date}/{time}
Adding a new dataset
The TSPP has been designed to work with most CSV input. In order to add an arbitrary dataset to the TSPP:
- Enter the Deep Learning Examples TSPP repository:
cd DeeplearningExamples/Tools/PyTorch/TimeSeriesPredictionPlatform
- Include the target dataset in the directory in which you want to keep your datasets. The directory can be arbitrary, and it is recommended not to include it in the TimeSeriesPredictionPlatform directory. This arbitrary directory will be mounted to the TSPP container later
cp -r /PATH/TO/YOUR/DATASET /your/datasets/
-
Create a configuration file for your dataset, found in TimeSeriesPredictionPlatform/conf/dataset, that includes the following values:
-
source_path: The path to the CSV that contains your dataset
-
dest_path: The path to where preprocessing should write your preprocessed dataset
-
time_ids: The name of the column within your source CSV that is the feature to split your training, validation, and test datasets on.
-
train_range, valid_range, test_range: The ranges that mark the edges of the train, validation, and test subsets. Remember that there can be overlap between subsets since predicting the first ‘unseen element’ requires the input of the seen elements before it.
-
dataset_stride: The stride the dataloader uses to walk the sliding window through the dataset. Default: 1
-
scale_per_id: Whether to scale continuous features during preprocessing using scalers fitted on just samples from the same ID (True), or all samples (False, Default)
-
encoder_length: The length of data known up until the ‘present’
-
example_length: The length of all data, including data known into the future. The target you are predicting lies on the difference between the example_length and encoder_length.
-
features: A list of the features that the model takes as input. Each feature should be represented by an object containing descriptive attributes. All features should have at least a feature_type (ID, TIME, TARGET, WEIGHT, SAMPLE_WEIGHT, KNOWN, OBSERVED, or STATIC) and feature_embed_type (CONTINUOUS or CATEGORICAL). Continuous features may have a scaler attribute that represents the type of scaler used in preprocessing. Categorical columns should have a cardinality attribute that represents the number of unique values that that feature takes. Examples can be found in the files in /TimeSeriesPredictionPlatform/conf/dataset/. Required features are one TIME feature, at least one ID feature, one TARGET feature, and at least one KNOWN, OBSERVED, or STATIC feature.
-
train_samples: The number of samples that should be taken at train time to use as train input to your model for a single epoch
-
valid_samples: The number of samples that should be taken at train time to use as validation input to your model for a single epoch
-
binarized: Whether or not preprocessing should accelerate data loading by outputting the preprocessed dataset in a binarized format
-
time_series_count: The number of unique time-series contained in the dataset.
-
-
After a specification has been written, it is ready to be preprocessed with:
docker build -t tspp .
docker run -it --gpus all -v /your/datasets/:/workspace/datasets/ --ipc=host tspp bash
python launch_preproc.py dataset={dataset_name}
For some models, additional parameters are required per each dataset. As mentioned in the Adding a new model section, there are examples of these model-dataset combination files in TimeSeriesPredictionPlatform/conf/model_dataset/. An example here would be model A requiring a specific hidden size when used on dataset B. In this case, TimeSeriesPredictionPlatform/conf/model_dataset/A_B.yaml should contain the desired hidden size under config.model.hidden_size
5. Test your dataset by training and evaluating a temporal fusion transformer. Training, validation, and testing are all included by default using the launch_tspp.py command shown below:
docker run -it --gpus all -v /your/datasets/:/workspace/datasets/ --ipc=host tspp bash
python launch_tspp.py dataset={YOUR_DATASET} model=tft criterion=quantile
If you encounter errors stating that srcIndex < value, verify that your categorical cardinalities are the correct size, as this error indicates that the value of a categorical you are trying to embed is too large for its respective embedding table.
Adding a new model
Models added to the prediction platform are subject to a few key constraints. Namely, the models should be constructed using vanilla PyTorch. Models should be handling the forecasting task (anomaly detection and classification are planned); models should expect that the data is fed in a sliding window and that tensors will be aggregated by Temporal/Data Type. An example of how this works can be found in data/data_utils.py. Integrated models should be expecting the data to be in the format described by the feature spec for a specific dataset (output being a dictionary of tensors aggregated based on temporal and feature type).
To integrate a model into the TSPP:
- Enter the Deep Learning Examples repository:
cd DeeplearningExamples
- Copy the model files into the Deep Learning Examples PyTorch/Forecasting/ directory:
cp -r /PATH/TO/YOUR/MODEL PyTorch/Forecasting/
- Write a configuration file for the model in
DeeplearningExamples/Tools/TimeSeriesPredictionPlatform/conf/model.
This configuration file should reflect the default configuration for your model. Within this file, the target of the model component should be set to point to your model class. If your model needs additional configuration values based on the dataset, you should create a configuration file in DeeplearningExamples/Tools/TimeSeriesPredictionPlatform/conf/model_dataset/{modelname_dataset_name.yaml} named according to the model and dataset names. Examples can be found in the DeeplearningExamples/Tools/TimeSeriesPredictionPlatform/conf/model/tft.yaml and DeeplearningExamples/Tools/TimeSeriesPredictionPlatform/conf/model_dataset/tft_traffic.yaml files.
- Build and launch container:
cd DeeplearningExamples/Tools/PyTorch
source scripts/setup.sh
docker build -t tspp TimeSeriesPredictionPlatform
docker run -it --rm --ipc=host --network=host --gpus all -v /PATH/TO/YOUR/DATASET/FOLDER/:/workspace/datasets/ tspp bash
- Verify that the model can be run within the TSPP:
python launch_tspp.py model={model_name}
Some additional values may be needed in this call. For example, if your model requires the Adam optimizer, you will need to append optimizer=Adam to your call.
Advanced
The following sections provide greater details of changing the dataset, altering the data preprocessing, and comparing the training results.
Running multi-GPU experiments
Launching on multi-GPU requires no changes to model code and can be executed as follows within a TSPP container:
python -m torch.distributed.run --nproc_per_node={num_GPUS} launch_tspp.py {override parameters} +config.device.world_size={num_GPUS}
Statistical models (like AutoARIMA)are not run on GPU, so they are not suitable for multi-GPU acceleration.
Running experiments with Exponential Moving Averaging
Exponential moving averaging is a technique in which, while training, the model weights are integrated into a weighted moving average, and the weighted moving average is used in lieu of the directly trained model weights at test time. Our experiments have found this technique improves the convergence properties of most models and datasets we work with. The full paper of EMA can be found here (https://arxiv.org/pdf/1803.05407.pdf)
To activate EMA in the TSPP, simply specify ‘ema=True’ in the command line call at runtime. The decay parameter in the moving average can be modified using the config.trainer.ema.decay parameter
Hyperparameter Search
Hyperparameter search can be used to find semi-optimal hyperparameter configurations for a given model or dataset. In the TSPP, hyperparameter search is driven by Optuna.
To launch hyperparameter search, one must first have a base config. One can be generated by running launch_tspp.py with desired values and +config.save_config=True and +config.save_path=/path/to/conf.yaml
Once a config file has been generated in /path/to/conf.yaml, open it and replace any field you want to include as a searchable hyperparameter with an optuna variable config. This optuna variable config describes the value you are searching on as well as the distribution that value is pulled from. The possible Optuna sampling objects and the parameters that you can use are:
- categorical: samples from values uniformly.
- values: The values categorical sampling can take
- int_uniform: samples uniformly from the range specified by (min_value, max_value, step_value)
- min_value: the minimum value that int_unfiorm sampling can take
- max_value: the maximum value that int_unfiorm sampling can take
- step_value (optional): the size of the steps in between possible samples
- float_uniform: samples uniformly from the range specified by (min_value, max_value)
- min_value: the minimum value that float_unfiorm sampling can take
- max_value: the maximum value that float_unfiorm sampling can take
- log_uniform: samples using the log distribution from the range specified by (min_value, max_value)
- min_value: the minimum value that log_unfiorm sampling can take
- max_value: the maximum value that log_unfiorm sampling can take
- discrete_uniform: samples uniformly from the range specified by (min_value, max_value, step_value)
- min_value: the minimum value that discrete_uniform sampling can take
- max_value: the maximum value that discrete_uniform sampling can take
- step_value (optional): the size of the steps in between possible samples
For example, to sample batch size between 512 and 1024, replace the batch size object with:
batch_size: sampling: categorical values: - 512 - 1024
To sample learning rate with uniform probability between .1 and 1, we can replace the lr with:
lr: sampling: float_uniform min_value: .1 max_value: 1.0
Once all desired values have been replaced with Optuna objects, append an Optuna field within the config to the bottom, with sub field n_trials to denote how many Optuna trials should be run and optionally a description of the Optuna sampler to use. Once this config file is saved, you can run python launch_optuna.py --config_path /path/to/conf.yaml. This script attempts to make use of all visible GPUs. Currently, we do not support using a varied number of GPUs for separate searches, meaning the world_size config field should be an integer instead of a list. In addition, we do not support the use of multi-process dataloading in parameter searches meaning the num_workers is set to 0. The number of concurrent trials being run is equal to the floor of the number of GPUs divided by the fixed world size. Outputs will still be saved to /workspace/outputs/{DATE}/{TIME}/. Each concurrent trial will perform independent n_trial different runs, yet all outputs are saved by the same optuna study. This means that if 4 subprocesses are launched with 10 trials specified in the config, then 40 trials are run. Optuna will always run n_trials trials, and will not necessarily run the entire set of possible runs if the set size is bounded. For example, if you ran a set of 4 trials, where the only Optuna object being optimized is a categorical with 3 values, not all 3 values would necessarily occur within the trials.
Conversion, Deployment, and Inference
Inference takes place after a model has been trained and one wants to run data through. Since this only entails using a forward function, the model can be optimized and converted to many different formats that can perform the forward pass more efficiently. In addition, one can set up a NVIDIA Triton inference server, which allows for a continuous stream of data to be presented to and passed through the model. The server provides an inference service via an HTTP or gRPC endpoint at ports 8000 and 8001, respectively, on the “bridge” docker network.
The TSPP supports a few versions of inference, including native inference and NVIDIA Triton deployment. Both use the test_forward function specified in the model config (defaults to forward()) as the forward function.
To launch native inference, one must have a checkpoint directory from a TSPP training call that includes a .hydra directory and a best_checkpoint.pth.tar. Then run
python launch_inference.py device={device} config.evaluator.checkpoint=/path/to/checkpoint/directory
Note: Do not confuse the checkpoint directory with the TimeSeriesPredictionPlatform/outputs/ directory. The directory to use in the inference call is two levels lower (for example, /path/to/TimeSeriesPredictionPlatform/outputs/2021-08-23/03-03-11/).
The device argument refers to the device that one would like the model to be built on and run on. Note that multi-GPU inference launches are not supported. By default, the evaluator uses the configs specified in the .hydra/config.yaml file from the checkpoint directory. One can override these by including them in the launch. For example, if one wanted to adjust the metrics to use MAE and RMSE only and to set the device to the CPU.
python launch_inference device=cpu config.evaluator.checkpoint=/path/to/checkpoint/directory “+config.evaluator.metrics=[‘MAE’, ‘RMSE’]”
Note: Be sure to include the + when overriding any of the evaluator configs.
Prior to the next section, make sure that the TSPP container is run with the following arguments from the TSPP directory
docker run -it --rm --gpus all --ipc=host --network=host -v /your/datasets/:/workspace/datasets/ -v /your/outputs/:/your/outputs/ -v $(pwd):$(pwd) -v /your/outputs/:/workspace/outputs/ -v /var/run/docker.sock:/var/run/docker.sock tspp
In the previous command, note that five different directories are mounted. The datasets are mounted to the usual location, but we have two different mount locations for outputs. Mounting the outputs to /workspace/outputs/ allows usual training calls to be saved in your output directory. The second output mount is mounted to the same path as the output directory is in the host. This is essential due to the way we deploy to NVIDIA Triton, the directory of the output in the docker must match the directory of the output on the host machine. Additionally, the mount for /var/run/docker.sock allows the tspp docker container to launch another container, in our case this is the NVIDIA Triton server. In subsequent calls to launch_deployment.py, the /path/to/checkpoint/directory/ must be of the form /your/outputs/{checkpoint_dir} instead of /workspace/outputs/{checkpoint_dir} and should be absolute paths. From testing, the best output directory to use appears to be TSPP/outputs.
Finally, note that to run the deployment script, you must be in the same directory path in the container as the TSPP is stored on your machine. This means that simply being in /workspace in the container may not work for running the deployment. If outside the container your TimeSeriesPredictionPlatform is at /home/user/TimeSeriesPredictionPlatform, you must be at the same path in your docker container (/home/user/TimeSeriesPredictionPlatform). This is the purpose of the -v $(pwd):$(pwd) in the run script.
To launch conversion and deployment, one must again have a checkpoint directory from a TSPP training call that includes a .hydra directory and a best_checkpoint.pth.tar. In addition, the model that will be converted must already support conversion to the required format. In the current version of the TSPP, we first export the model to either TorchScript-Script or TorchScript-Trace and subsequently convert to TorchScript, Onnx, or TRT using the model-navigator package. We also support export to Onnx and conversion to both Onnx and TRT. To run
python launch_deployment export={ts-trace, ts-script, onnx} convert={torchscript, onnx, trt} config.evaluator.checkpoint=/path/to/checkpoint/directory
The format mapping is listed below TorchScript-Script: ts-script TorchScript-Trace: ts-trace TorchScript: torchscript Onnx: onnx TRT: trt
Note that the conversions do not support the apex fused LayerNorm library. In order to get around this, we set the os environ variable ‘TFT_SCRIPTING” to True when loading the model for deployment. This changes the apex LayerNorm to vanilla torch LayerNorm.
Similarly to the native inference, one can again override the evaluator configs. In addition, one can select the batch size and precision of the conversion, using config.inference.batch_size and config.inference.precision=Choice[ fp32, fp16 ] respectively. Once export and conversion have been done, the results are stored in /path/to/checkpoint/directory/deployment. Subsequently, the converted model’s NVIDIA Triton config is generated in the /path/to/checkpoint/directory/deployment/navigator_workspace/model-store/ directory. In addition a docker NVIDIA Triton server is launched based on this directory and inference is run through NVIDIA Triton. Finally, the outputs of this inference are used to calculate the metrics. The outputs of this inference and results of the metric calculation are stored in the brand new output directory created at TimeSeriesPredictionPlatform/outputs/today’s date/time at launch/. Within this directory the metrics are stored in metrics.csv, and the raw outputs of the inference are stored in the raw/ directory. The NVIDIA Triton model name is set as the second directory to the model. For example, in the case of our TFT model, whose path is models.tft_pyt.TemporalFusionTransformer, the name of the NVIDIA Triton model is tft_pyt.
An additional option in running deployment is selecting whether to run the basics of conversion and NVIDIA Triton config creation or to run the full pipeline of conversion, NVIDIA Triton config creation, profiling, analysis, and helm chart creation. Setting config.inference.optimize=True during launch switches to the full pipeline. Another part of optimization is setting the backend accelerator for NVIDIA Triton config generation. Setting config.inference.accelerator=Choice[none, trt] changes the accelerator specified. Note that this defaults to ‘none’ and ‘trt’ is only compatible with the Onnx conversion. If one wants to launch the NVIDIA Triton inference server using a specific GPU, the cuda index can be specified with the config option config.inference.gpu, which defaults to 0.
More information on the conversion is located here: https://github.com/triton-inference-server/model_navigator/blob/main/docs/conversion.md
More information on the NVIDIA Triton config creation is located here: https://github.com/triton-inference-server/model_navigator/blob/main/docs/triton_model_configurator.md
More information on the full pipeline is located here: https://github.com/triton-inference-server/model_navigator/blob/main/docs/run.md
If one only wants to run the latter part of the launch_deployment script, which includes the NVIDIA Triton server initialization, inference, and metrics calculation, set the option config.inference.skip_conversion=True at launch. The call still requires the checkpoint directory and for that directory to be set up in the same format as the result for a regular launch_deployment call (contains a deployment/navigator_workspace/model-store/ directory with the NVIDIA Triton models).
For this option of skipping the conversion, there is a config option +config.inference.model_name, which can be set to the NVIDIA Triton model name. This does not set the name of the model, but rather selects which of the possible models in the model-store directory will be used for inference. This is useful after a call using the optimize option, which can generate multiple different models in the model-store.
If one only wants to launch the NVIDIA Triton server and keep it live, set the option config.inference.just_deploy=True at launch. Again, like the previous option of skipping conversion, the checkpoint directory is still required and must conform to the format for the NVIDIA Triton models. This will not run inference automatically nor perform any other actions, it will solely start the NVIDIA Triton server using the given models.
For both the launch_inference and launch_deployment one can specify what dataset and target_scalers to use (if any) as long as the data shapes do not conflict with the already trained model. To specify a dataset directory use +config.inference.dataset_dir=/path/to/dataset. The dataset directory must contain a composite_scaler.bin file as well as either train.bin/valid.bin/test.bin or train.csv/valid.csv/test.csv depending on the configuration option config.dataset.binarized (this option cannot be changed during deployment or inference). Once the path has been set, deployment and inference both use the test dataset.
Our TFT model supports export to TorchScript-Trace and conversion to all formats.
If you encounter an error such as
RuntimeError: Model tft_pyt:1 is not ready
Or
ERROR root Exception in callback <function InferenceServerClient.async_infer.<locals>.wrapped_callback at 0x7f9437b469d0>: AttributeError("'InferenceServerException' object has no attribute 'get_response'")
There are a few possible reasons for this to come up. First, make sure that when the TSPP docker container was launched the network argument was set to host. Next, one can run “docker ps”; if the container “trt_server_cont” shows up, close it using “docker stop trt_server_cont”. After this, one should try rerunning the command. If neither of these steps is applicable or the problem persists, it is a more specific issue that requires more debugging.
Parameters
Parameters for each individual component are stored in
/workspace/conf/{component_type}/{component_name}.yaml
For example, the default parameters for TFT are stored in
/workspace/conf/model/tft.yaml
For component selection, the options are:
dataset: electricity, traffic
model: tft, auto_arima, trivial_model
criterion: GLL, MSE, quantile
device: cuda, cuda_8GPU, cpu
optimizer: refer to /workspace/conf/optimizer
ema: True, this is assumed False by default.
amp: True, this is assumed False by default.
If a parameter does not exist in the config, you must prepend + to its reference in the command line call. For example, +config.evaluator.target_scalers=... adds target_scalers to config.evaluator, but config.evaluator.target_scalers=... errors.
Non-individual component-specific parametrization is listed below. Parameters are listed hierarchically, that is the config has an attribute trainer, which has an attribute num_epochs that controls the length of training:
config.log_path: where to save your logs
config.trainer.batch_size: the batch size to use
config.trainer.num_workers: the number of workers to use for dataloading
config.trainer.num_epochs: the number of epochs to train the model for
config.trainer.AMP: whether to enable AMP for accelerated training
config.dataset.source_path: where the original file (before preproc) is stored
config.dataset.dest_path: the directory from which to save/read the preprocessed dataset
config.dataset.time_ids: the feature on which to split the dataset into train, valid, test
config.dataset.train_range: the range of the time feature that represents the train set
config.dataset.valid_range: the range of the time feature that represents the validation set
config.dataset.test_range: the range of the time feature that represents the test set
config.dataset.dataset_stride: the stride to use when creating the dataset
config.dataset.scale_per_id: whether to scale each series based on series statistics (True) or statistics across all series (False)
config.dataset.encoder_length: the length of past data that is fed to the model
config.dataset.example_length: the length of the full data that we are passing to the model. The length of the prediction horizon is the difference between encoder and example length
config.dataset.features: the features that the model will be using
config.dataset.train_samples: the number of examples to sample for our train dataset from our train partition
config.dataset.valid_samples: the number of examples to sample for our validation dataset from our validation partition
config.dataset.binarized: whether or not to use a binarized dataset for speedup
config.device.world_size: the number of GPUs the launcher is running on
config.optimizer.gradient_norm: the maximum norm of gradients allowed via gradient clipping
config.optimizer.lr: the learning rate to use for the optimizer
NOTE: Any optimizer from torch.optim can be used, and all keywords can be specified by changing config.optimizer with an additional attribute
config.evaluator.use_weights: whether to weight metrics by weights specified in the input. Note: There must be a WEIGHT feature specified in config.dataset.features for this feature to work
config.evaluator.target_scalers: scalers used to unscale targets so that non-normalized predictions and targets are used for metric calculation
config.evaluator.output_selector: selects which output to use if the model has multiple outputs per time step (quantiles are an example)
config.evaluator.label_selector: selects which label to use if the labels have multiple values per time step
config.evaluator.precision: the precision to format the output metrics to
config.evaluator.metrics: a list of metrics to calculate on the test set
config.evaluator.checkpoint: path to the checkpoint directory containing the checkpoint to be loaded for inference/deployment
config.inference.batch_size: the batch size to be used for inference or deployment
config.inference.precision: the precision of the exported model
config.inference.optimize: setting to True runs the model-navigator run script over the convert and triton-config-model
config.inference.skip_conversion: during deployment, skips the export, conversion, and configuration. Instead, starts the inference server, run inference, and calculate metrics
config.inference.just_deploy: starts the NVIDIA Triton server based on the NVIDIA Triton model specified in the checkpoint directory
config.inference.dataset_dir: overrides the default dataset path
config.inference.model_name: uses the model listed under this model name when deploying to the NVIDIA Triton server. This will not change the default name assigned to the models in the model-store directory
config.inference.accelerator: switches the backend accelerator in the triton-config-model step of the process,
config.inference.gpu: uses the gpu at this cuda index when launching the NVIDIA Triton inference server
Release Notes
We’re constantly refining and improving our performance on AI and HPC workloads, even on the same hardware with frequent updates to our software stack. For our latest performance data, refer to these pages for AI and HPC benchmarks.
Changelog
November 2021
- Initial release
Known issues
There are no known issues with this tool.