| .. | ||
| img | ||
| scripts | ||
| seq2seq | ||
| .dockerignore | ||
| .gitignore | ||
| Dockerfile | ||
| launch.py | ||
| LICENSE | ||
| README.md | ||
| requirements.txt | ||
| train.py | ||
| translate.py | ||
GNMT v2 For PyTorch
This repository provides a script and recipe to train GNMT v2 to achieve state of the art accuracy, and is tested and maintained by NVIDIA.
Table Of Contents
The model
The GNMT v2 model is similar to the one discussed in the Google's Neural Machine Translation System: Bridging the Gap between Human and Machine Translation paper.
The most important difference between the two models is in the attention mechanism. In our model, the output from the first LSTM layer of the decoder goes into the attention module, then the re-weighted context is concatenated with inputs to all subsequent LSTM layers in the decoder at the current timestep.
The same attention mechanism is also implemented in the default GNMT-like models from TensorFlow Neural Machine Translation Tutorial and NVIDIA OpenSeq2Seq Toolkit.
Default configuration
The following features were implemented in this model:
- general:
- encoder and decoder are using shared embeddings
- data-parallel multi-gpu training
- dynamic loss scaling with backoff for Tensor Cores (mixed precision) training
- trained with label smoothing loss (smoothing factor 0.1)
- encoder:
- 4-layer LSTM, hidden size 1024, first layer is bidirectional, the rest are unidirectional
- with residual connections starting from 3rd layer
- uses standard pytorch nn.LSTM layer
- dropout is applied on input to all LSTM layers, probability of dropout is set to 0.2
- hidden state of LSTM layers is initialized with zeros
- weights and bias of LSTM layers is initialized with uniform(-0.1, 0.1) distribution
- decoder:
- 4-layer unidirectional LSTM with hidden size 1024 and fully-connected classifier
- with residual connections starting from 3rd layer
- uses standard pytorch nn.LSTM layer
- dropout is applied on input to all LSTM layers, probability of dropout is set to 0.2
- hidden state of LSTM layers is initialized with zeros
- weights and bias of LSTM layers is initialized with uniform(-0.1, 0.1) distribution
- weights and bias of fully-connected classifier is initialized with uniform(-0.1, 0.1) distribution
- attention:
- normalized Bahdanau attention
- output from first LSTM layer of decoder goes into attention, then re-weighted context is concatenated with the input to all subsequent LSTM layers of the decoder at the current timestep
- linear transform of keys and queries is initialized with uniform(-0.1, 0.1), normalization scalar is initialized with 1.0 / sqrt(1024), normalization bias is initialized with zero
- inference:
- beam search with default beam size of 5
- with coverage penalty and length normalization, coverage penalty factor is set to 0.1, length normalization factor is set to 0.6 and length normalization constant is set to 5.0
- de-tokenized BLEU computed by SacreBLEU
- motivation for choosing SacreBLEU
When comparing the BLEU score, there are various tokenization approaches and BLEU calculation methodologies; therefore, ensure you align similar metrics.
Code from this repository can be used to train a larger, 8-layer GNMT v2 model.
Our experiments show that a 4-layer model is significantly faster to train and
yields comparable accuracy on the public
WMT16 English-German
dataset. The number of LSTM layers is controlled by the --num_layers
parameter in the train.py training script.
Setup
The following section list the requirements in order to start training the GNMT v2 model.
Requirements
This repository contains Dockerfile which extends the PyTorch NGC container
and encapsulates some dependencies. Aside from these dependencies, ensure you
have the following components:
For more information about how to get started with NGC containers, see the following sections from the NVIDIA GPU Cloud Documentation and the Deep Learning DGX Documentation:
- Getting Started Using NVIDIA GPU Cloud,
- Accessing And Pulling From The NGC container registry,
- Running PyTorch.
Training using mixed precision with Tensor Cores
Before you can train using mixed precision with Tensor Cores, ensure that you have a NVIDIA Volta based GPU. Other platforms might likely work but aren't officially supported. For information about how to train using mixed precision, see the Mixed Precision Training paper and Training With Mixed Precision documentation.
Another option for adding mixed-precision support is available from NVIDIA’s APEX, A PyTorch Extension, that contains utility libraries, such as AMP, which require minimal network code changes to leverage Tensor Core performance.
Quick Start Guide
To train your model using mixed precision with Tensor Cores or using FP32, perform the following steps using the default parameters of the GNMT v2 model on the WMT16 English German dataset.
1. Clone the repository.
git clone https://github.com/NVIDIA/DeepLearningExamples
cd DeepLearningExamples/PyTorch/Translation/GNMT
2. Build the GNMT v2 container.
bash scripts/docker/build.sh
3. Start an interactive session in the container to run training/inference.
bash scripts/docker/interactive.sh
4. Download and preprocess the dataset.
Data will be downloaded to the data directory (on the host). The data
directory is mounted to the /workspace/gnmt/data location in the Docker
container.
bash scripts/wmt16_en_de.sh
5. Start training.
By default, the training script will use all available GPUs. The training script
saves only one checkpoint with the lowest value of the loss function on the
validation dataset. All results and logs are saved to the results directory
(on the host) or to the /workspace/gnmt/results directory (in the container).
By default, the train.py script will launch mixed precision training
with Tensor Cores. You can change this behaviour by setting the --math fp32
flag for the train.py training script.
To launch mixed precision training on 1, 4 or 8 GPUs, run:
python3 -m launch train.py --seed 2 --train-global-batch-size 1024
To launch mixed precision training on 16 GPUs, run:
python3 -m launch train.py --seed 2 --train-global-batch-size 2048
By default the training script will launch training with batch size 128 per GPU.
If specified --train-global-batch-size is larger than 128 times the number of
GPUs available for the training then the training script will accumulate
gradients over consecutive iterations and then perform the weight update.
For example 1 GPU training with --train-global-batch-size 1024 will accumulate
gradients over 8 iterations before doing the weight update with accumulated
gradients.
6. Start evaluation.
The training process automatically runs evaluation and outputs the BLEU score after each training epoch. Additionally, after the training is done, you can manually run inference on test dataset with the checkpoint saved during the training.
To launch mixed precision inference on 1 GPU, run:
python3 translate.py --input data/wmt16_de_en/newstest2014.tok.bpe.32000.en \
  --reference data/wmt16_de_en/newstest2014.de --output /tmp/output \
  --model results/gnmt/model_best.pth --batch-size 128
By default, the translate.py script will launch mixed precision inference
with Tensor Cores. You can change this behaviour by setting the --math fp32
flag for the translate.py inference script.
Details
The following sections provide greater details of the dataset, running training and inference, and the training results.
Command line arguments
To see the full list of available options and their descriptions, use the -h
or --help command line option, for example:
For training:
python3 train.py --help
To summarize, the most useful arguments for training are as follows:
dataset setup:
  --dataset-dir DATASET_DIR
                        path to the directory with training/test data
                        (default: data/wmt16_de_en)
results setup:
  --results-dir RESULTS_DIR
                        path to directory with results, it will be
                        automatically created if it does not exist (default:
                        results)
  --save SAVE           defines subdirectory within RESULTS_DIR for results
                        from this training run (default: gnmt)
  --print-freq PRINT_FREQ
                        print log every PRINT_FREQ batches (default: 10)

model setup:
  --num-layers NUM_LAYERS
                        number of RNN layers in encoder and in decoder
                        (default: 4)
general setup:
  --math {fp16,fp32}    arithmetic type (default: fp16)
  --seed SEED           master seed for random number generators, if "seed" is
                        undefined then the master seed will be sampled from
                        random.SystemRandom() (default: None)
training setup:
  --train-batch-size TRAIN_BATCH_SIZE
                        training batch size per worker (default: 128)
  --train-global-batch-size TRAIN_GLOBAL_BATCH_SIZE
                        global training batch size, this argument does not
                        have to be defined, if it is defined it will be used
                        to automatically compute train_iter_size using the
                        equation: train_iter_size = train_global_batch_size //
                        (train_batch_size * world_size) (default: None)
  --train-iter-size N   training iter size, training loop will accumulate
                        gradients over N iterations and execute optimizer
                        every N steps (default: 1)
  --epochs EPOCHS       max number of training epochs (default: 6)

optimizer setup:
  --optimizer OPTIMIZER
                        training optimizer (default: Adam)
  --lr LR               learning rate (default: 0.002)

test setup:
  --beam-size BEAM_SIZE
                        beam size (default: 5)
For inference:
python3 translate.py --help
To summarize, the most useful arguments for inference are as follows:
data setup:
  --dataset-dir DATASET_DIR
                        path to directory with training/test data (default:
                        data/wmt16_de_en/)
  -i INPUT, --input INPUT
                        full path to the input file (tokenized) (default:
                        None)
  -o OUTPUT, --output OUTPUT
                        full path to the output file (tokenized) (default:
                        None)
  -r REFERENCE, --reference REFERENCE
                        full path to the file with reference translations (for
                        sacrebleu) (default: None)
  -m MODEL, --model MODEL
                        full path to the model checkpoint file (default: None)

inference setup:
  --batch-size BATCH_SIZE [BATCH_SIZE ...]
                        batch size per GPU (default: [128])
  --beam-size BEAM_SIZE [BEAM_SIZE ...]
                        beam size (default: [5])
  --max-seq-len MAX_SEQ_LEN
                        maximum generated sequence length (default: 80)

general setup:
  --math {fp16,fp32} [{fp16,fp32} ...]
                        arithmetic type (default: ['fp16'])
  --bleu                compares with reference translation and computes BLEU
                        (use '--no-bleu' to disable) (default: True)
  --print-freq PRINT_FREQ, -p PRINT_FREQ
                        print log every PRINT_FREQ batches (default: 1)
Getting the data
The GNMT v2 model was trained on the WMT16 English-German dataset. Concatenation of the newstest2015 and newstest2016 test sets are used as a validation dataset and the newstest2014 is used as a testing dataset.
<<<<<<< HEAD
This repository contains the scripts/wmt16_en_de.sh download script which
automatically downloads and preprocesses the training, validation and test
datasets. By default, data is downloaded to the data directory.
Our download script is very similar to the wmt16_en_de.sh script from the
tensorflow/nmt
repository. Our download script contains an extra preprocessing step, which
discards all pairs of sentences which can't be decoded by latin-1 encoder.
The scripts/wmt16_en_de.sh script uses the
subword-nmt
<<<<<<< HEAD
package to segment text into subword units (Byte Pair Encodings -
BPE). By default, the
script builds the shared vocabulary of 32,000 tokens.
In order to test with other datasets, scripts need to be customized accordingly.
Training process
The default training configuration can be launched by running the
train.py training script.
By default, the training script saves only one checkpoint with the lowest value
of the loss function on the validation dataset, an evaluation is performed after
each training epoch. Results are stored in the results/gnmt directory.
The training script launches data-parallel training with batch size 128 per GPU
on all available GPUs. We have tested reliance on up to 16 GPUs on a single
node.
After each training epoch, the script runs an evaluation
on the validation dataset and outputs a BLEU score on the test dataset
(newstest2014). BLEU is computed by the
SacreBLEU
package. Logs from the training and evaluation are saved to the results
directory.
The summary after each training epoch is printed in the following format:
Summary: Epoch: 3	Training Loss: 3.1735	Validation Loss: 3.0511	Test BLEU: 21.89
Performance: Epoch: 3  Training: 300155 Tok/s  Validation: 156066 Tok/s
The training loss is averaged over an entire training epoch, the validation loss is averaged over the validation dataset and the BLEU score is computed on the test dataset. Performance is reported in total tokens per second. The result is averaged over an entire training epoch and summed over all GPUs participating in the training.
Even though the training script uses all available GPUs, you can change this
behavior by setting the CUDA_VISIBLE_DEVICES variable in your environment or
by setting the NV_GPU variable at the Docker container launch
(see section "GPU isolation").
By default, the train.py script will launch mixed precision training
with Tensor Cores. You can change this behaviour by setting the --math fp32
flag for the train.py script.
To view all available options for training, run python3 train.py --help.
Inference process
Inference can be run by launching the translate.py inference script, although,
it requires a pre-trained model checkpoint and tokenized input.
The inference script, translate.py, supports batched inference. By default, it
launches beam search with beam size of 5, coverage penalty term and length
normalization term. Greedy decoding can be enabled by setting the beam size to 1.
To view all available options for inference, run python3 translate.py --help.
Results
The following sections provide details on how we achieved our performance and accuracy in training and inference.
Training accuracy results
Our results were obtained by running the train.py script with the default
batch size = 128 per GPU in the pytorch-19.01-py3 Docker container.
NVIDIA DGX-1 (8x Tesla V100 16G)
Command to launch the training:
python3 -m launch train.py --seed 2 --train-global-batch-size 1024
| Number of GPUs | Batch size/GPU | Mixed precision BLEU | FP32 BLEU | Mixed precision training time | FP32 training time |
|---|---|---|---|---|---|
| 1 | 128 | 24.59 | 24.71 | 264.4 minutes | 824.4 minutes |
| 4 | 128 | 24.30 | 24.45 | 89.5 minutes | 230.8 minutes |
| 8 | 128 | 24.45 | 24.48 | 46.2 minutes | 116.6 minutes |
To achieve these same results, follow the Quick Start Guide outlined above.
NVIDIA DGX-2 (16x Tesla V100 32G)
Commands to launch the training:
for 1,4,8 GPUs:
python3 -m launch train.py --seed 2 --train-global-batch-size 1024
for 16 GPUs:
python3 -m launch train.py --seed 2 --train-global-batch-size 2048
| Number of GPUs | Batch size/GPU | Mixed precision BLEU | FP32 BLEU | Mixed precision training time | FP32 training time |
|---|---|---|---|---|---|
| 1 | 128 | 24.59 | 24.71 | 265.0 minutes | 825.1 minutes |
| 4 | 128 | 24.69 | 24.33 | 87.4 minutes | 216.3 minutes |
| 8 | 128 | 24.50 | 24.47 | 49.6 minutes | 113.5 minutes |
| 16 | 128 | 24.22 | 24.16 | 26.3 minutes | 58.6 minutes |
To achieve these same results, follow the Quick Start Guide outlined above.
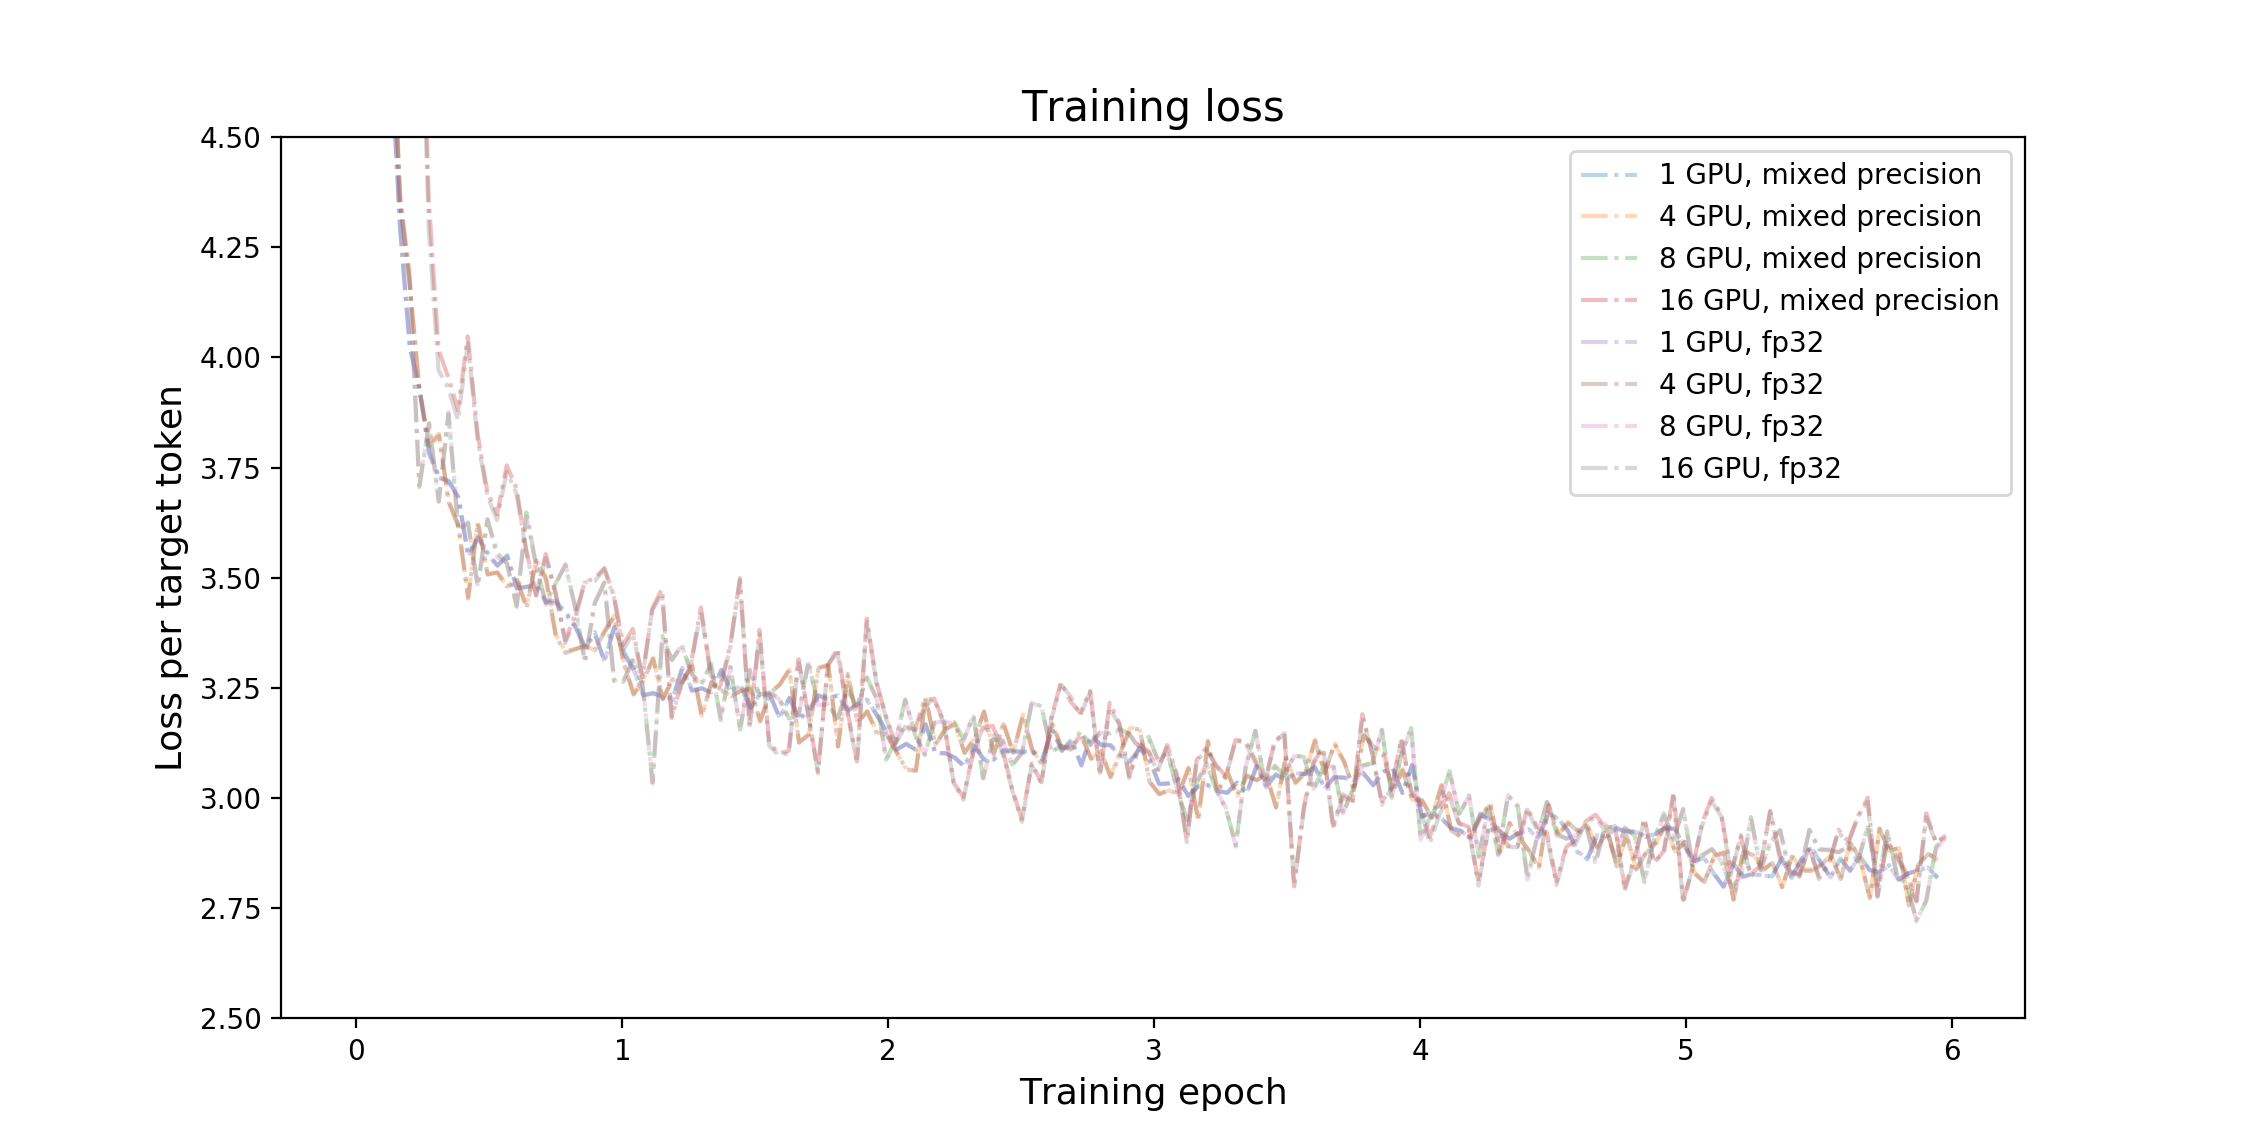
Training stability test
The GNMT v2 model was trained for 6 epochs, starting from 50 different initial random seeds. After each training epoch, the model was evaluated on the test dataset and the BLEU score was recorded. The training was performed in the pytorch-19.01-py3 Docker container on NVIDIA DGX-1 with 8 Tesla V100 16G GPUs. The following table summarizes results of the stability test.
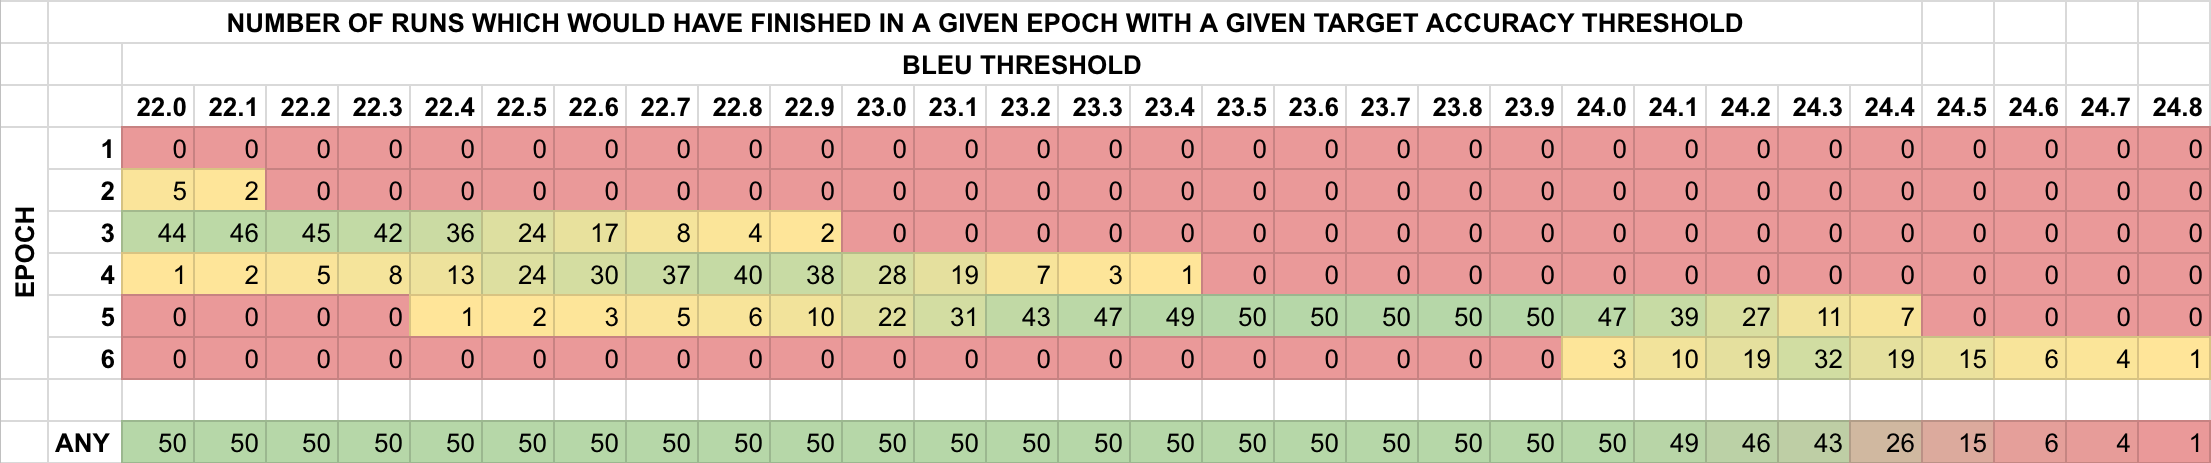
In the following table, the BLEU scores after each training epoch for different initial random seeds are displayed.
| Epoch | Average | Standard deviation | Minimum | Maximum | Median |
|---|---|---|---|---|---|
| 1 | 19.954 | 0.326 | 18.710 | 20.490 | 20.020 |
| 2 | 21.734 | 0.222 | 21.220 | 22.120 | 21.765 |
| 3 | 22.502 | 0.223 | 21.960 | 22.970 | 22.485 |
| 4 | 23.004 | 0.221 | 22.350 | 23.430 | 23.020 |
| 5 | 24.201 | 0.146 | 23.900 | 24.480 | 24.215 |
| 6 | 24.423 | 0.159 | 24.070 | 24.820 | 24.395 |
Training performance results
Our results were obtained by running the train.py training script in the
pytorch-19.01-py3 Docker container. Performance numbers (in tokens per second)
were averaged over an entire training epoch.
NVIDIA DGX-1 (8x Tesla V100 16G)
| Number of GPUs | Batch size/GPU | Mixed precision tokens/s | FP32 tokens/s | Mixed precision speedup | Mixed precision multi-gpu strong scaling | FP32 multi-gpu strong scaling |
|---|---|---|---|---|---|---|
| 1 | 128 | 66050 | 21346 | 3.094 | 1.000 | 1.000 |
| 4 | 128 | 196174 | 76083 | 2.578 | 2.970 | 3.564 |
| 8 | 128 | 387282 | 153697 | 2.520 | 5.863 | 7.200 |
To achieve these same results, follow the Quick Start Guide outlined above.
NVIDIA DGX-2 (16x Tesla V100 32G)
| Number of GPUs | Batch size/GPU | Mixed precision tokens/s | FP32 tokens/s | Mixed precision speedup | Mixed precision multi-gpu strong scaling | FP32 multi-gpu strong scaling |
|---|---|---|---|---|---|---|
| 1 | 128 | 65830 | 22695 | 2.901 | 1.000 | 1.000 |
| 4 | 128 | 200886 | 81224 | 2.473 | 3.052 | 3.579 |
| 8 | 128 | 362612 | 156536 | 2.316 | 5.508 | 6.897 |
| 16 | 128 | 738521 | 314831 | 2.346 | 11.219 | 13.872 |
To achieve these same results, follow the Quick Start Guide outlined above.
Inference performance results
Our results were obtained by running the translate.py script in the
pytorch-19.01-py3 Docker container on NVIDIA DGX-1. Inference benchmark was run
on a single Tesla V100 16G GPU. The benchmark requires a checkpoint from a fully
trained model.
Command to launch the inference benchmark:
python3 translate.py --input data/wmt16_de_en/newstest2014.tok.bpe.32000.en \
  --reference data/wmt16_de_en/newstest2014.de --output /tmp/output \
  --model results/gnmt/model_best.pth --batch-size 32 128 512 \
  --beam-size 1 2 5 10 --math fp16 fp32
| Batch size | Beam size | Mixed precision BLEU | FP32 BLEU | Mixed precision tokens/s | FP32 tokens/s |
|---|---|---|---|---|---|
| 32 | 1 | 23.18 | 23.18 | 23571 | 19462 |
| 32 | 2 | 24.09 | 24.12 | 15303 | 12345 |
| 32 | 5 | 24.63 | 24.62 | 13644 | 7725 |
| 32 | 10 | 24.50 | 24.48 | 11049 | 5359 |
| 128 | 1 | 23.17 | 23.18 | 73429 | 42272 |
| 128 | 2 | 24.07 | 24.12 | 43373 | 23131 |
| 128 | 5 | 24.69 | 24.63 | 29646 | 12525 |
| 128 | 10 | 24.45 | 24.48 | 19100 | 6886 |
| 512 | 1 | 23.17 | 23.18 | 135333 | 48962 |
| 512 | 2 | 24.08 | 24.12 | 74367 | 27308 |
| 512 | 5 | 24.60 | 24.63 | 39217 | 12674 |
| 512 | 10 | 24.54 | 24.48 | 21433 | 6640 |
To achieve these same results, follow the Quick Start Guide outlined above.
Changelog
- Aug 7, 2018
- Initial release
- Dec 4, 2018
- Added exponential warm-up and step learning rate decay
- Multi-GPU (distributed) inference and validation
- Default container updated to PyTorch 18.11-py3
- General performance improvements
- Feb 14, 2019
- Different batching algorithm (bucketing with 5 equal-width buckets)
- Additional dropouts before first LSTM layer in encoder and in decoder
- Weight initialization changed to uniform (-0.1, 0.1)
- Switched order of dropout and concatenation with attention in decoder
- Default container updated to PyTorch 19.01-py3
Known issues
There are no known issues in this release.