| .. | ||
| README.md | ||
Distributed Minio Quickstart Guide 


Minio in distributed mode lets you pool multiple drives (even on different machines) into a single object storage server. As drives are distributed across several nodes, distributed Minio can withstand multiple node failures and yet ensure full data protection.
Why distributed Minio?
Minio in distributed mode can help you setup a highly-available storage system with a single object storage deployment. With distributed Minio, you can optimally use storage devices, irrespective of their location in a network.
Data protection
Distributed Minio provides protection against multiple node/drive failures and bit rot using erasure code. As the minimum disks required for distributed Minio is 4 (same as minimum disks required for erasure coding), erasure code automatically kicks in as you launch distributed Minio.
High availability
A stand-alone Minio server would go down if the server hosting the disks goes offline. In contrast, a distributed Minio setup with n disks will have your data safe as long as n/2 or more disks are online. You'll need a minimum of (n/2 + 1) Quorum disks to create new objects though.
For example, an 8-node distributed Minio setup, with 1 disk per node would stay put, even if upto 4 nodes are offline. But, you'll need at least 5 nodes online to create new objects.
Limits
As with Minio in stand-alone mode, distributed Minio has a per tenant limit of minimum 4 and maximum 16 drives (imposed by erasure code). This helps maintain simplicity and yet remain scalable. If you need a multiple tenant setup, you can easily spin multiple Minio instances managed by orchestration tools like Kubernetes.
Note that with distributed Minio you can play around with the number of nodes and drives as long as the limits are adhered to. For example, you can have 2 nodes with 4 drives each, 4 nodes with 4 drives each, 8 nodes with 2 drives each, and so on.
Consistency Guarantees
Minio follows strict read-after-write consistency model for all i/o operations both in distributed and standalone modes.
Get started
If you're aware of stand-alone Minio set up, the process remains largely the same, as the Minio server automatically switches to stand-alone or distributed mode, depending on the command line parameters.
1. Prerequisites
Install Minio - Minio Quickstart Guide.
2. Run distributed Minio
To start a distributed Minio instance, you just need to pass drive locations as parameters to the minio server command. Then, you’ll need to run the same command on all the participating nodes.
Note
- All the nodes running distributed Minio need to have same access key and secret key for the nodes to connect. To achieve this, you need to export access key and secret key as environment variables on all the nodes before executing Minio server command.
- Disks used for Minio distributed should be fresh with no pre-existing data.
- The IP addresses and drive paths below are for demonstration purposes only, you need to replace these with the actual IP addresses and drive paths/folders.
- Servers running distributed Minio instances should be less than 3 seconds apart. You can use NTP as a best practice to ensure consistent times across servers.
- Running Distributed Minio on Windows is experimental as of now. Please proceed with caution.
Example 1: Start distributed Minio instance with 1 drive each on 8 nodes, by running this command on all the 8 nodes.
GNU/Linux and macOS
export MINIO_ACCESS_KEY=<ACCESS_KEY>
export MINIO_SECRET_KEY=<SECRET_KEY>
minio server http://192.168.1.11/export1 http://192.168.1.12/export2 \
               http://192.168.1.13/export3 http://192.168.1.14/export4 \
               http://192.168.1.15/export5 http://192.168.1.16/export6 \
               http://192.168.1.17/export7 http://192.168.1.18/export8
Windows
set MINIO_ACCESS_KEY=<ACCESS_KEY>
set MINIO_SECRET_KEY=<SECRET_KEY>
minio.exe server http://192.168.1.11/C:/data http://192.168.1.12/C:/data ^
                  http://192.168.1.13/C:/data http://192.168.1.14/C:/data ^
                  http://192.168.1.15/C:/data http://192.168.1.16/C:/data ^
                  http://192.168.1.17/C:/data http://192.168.1.18/C:/data

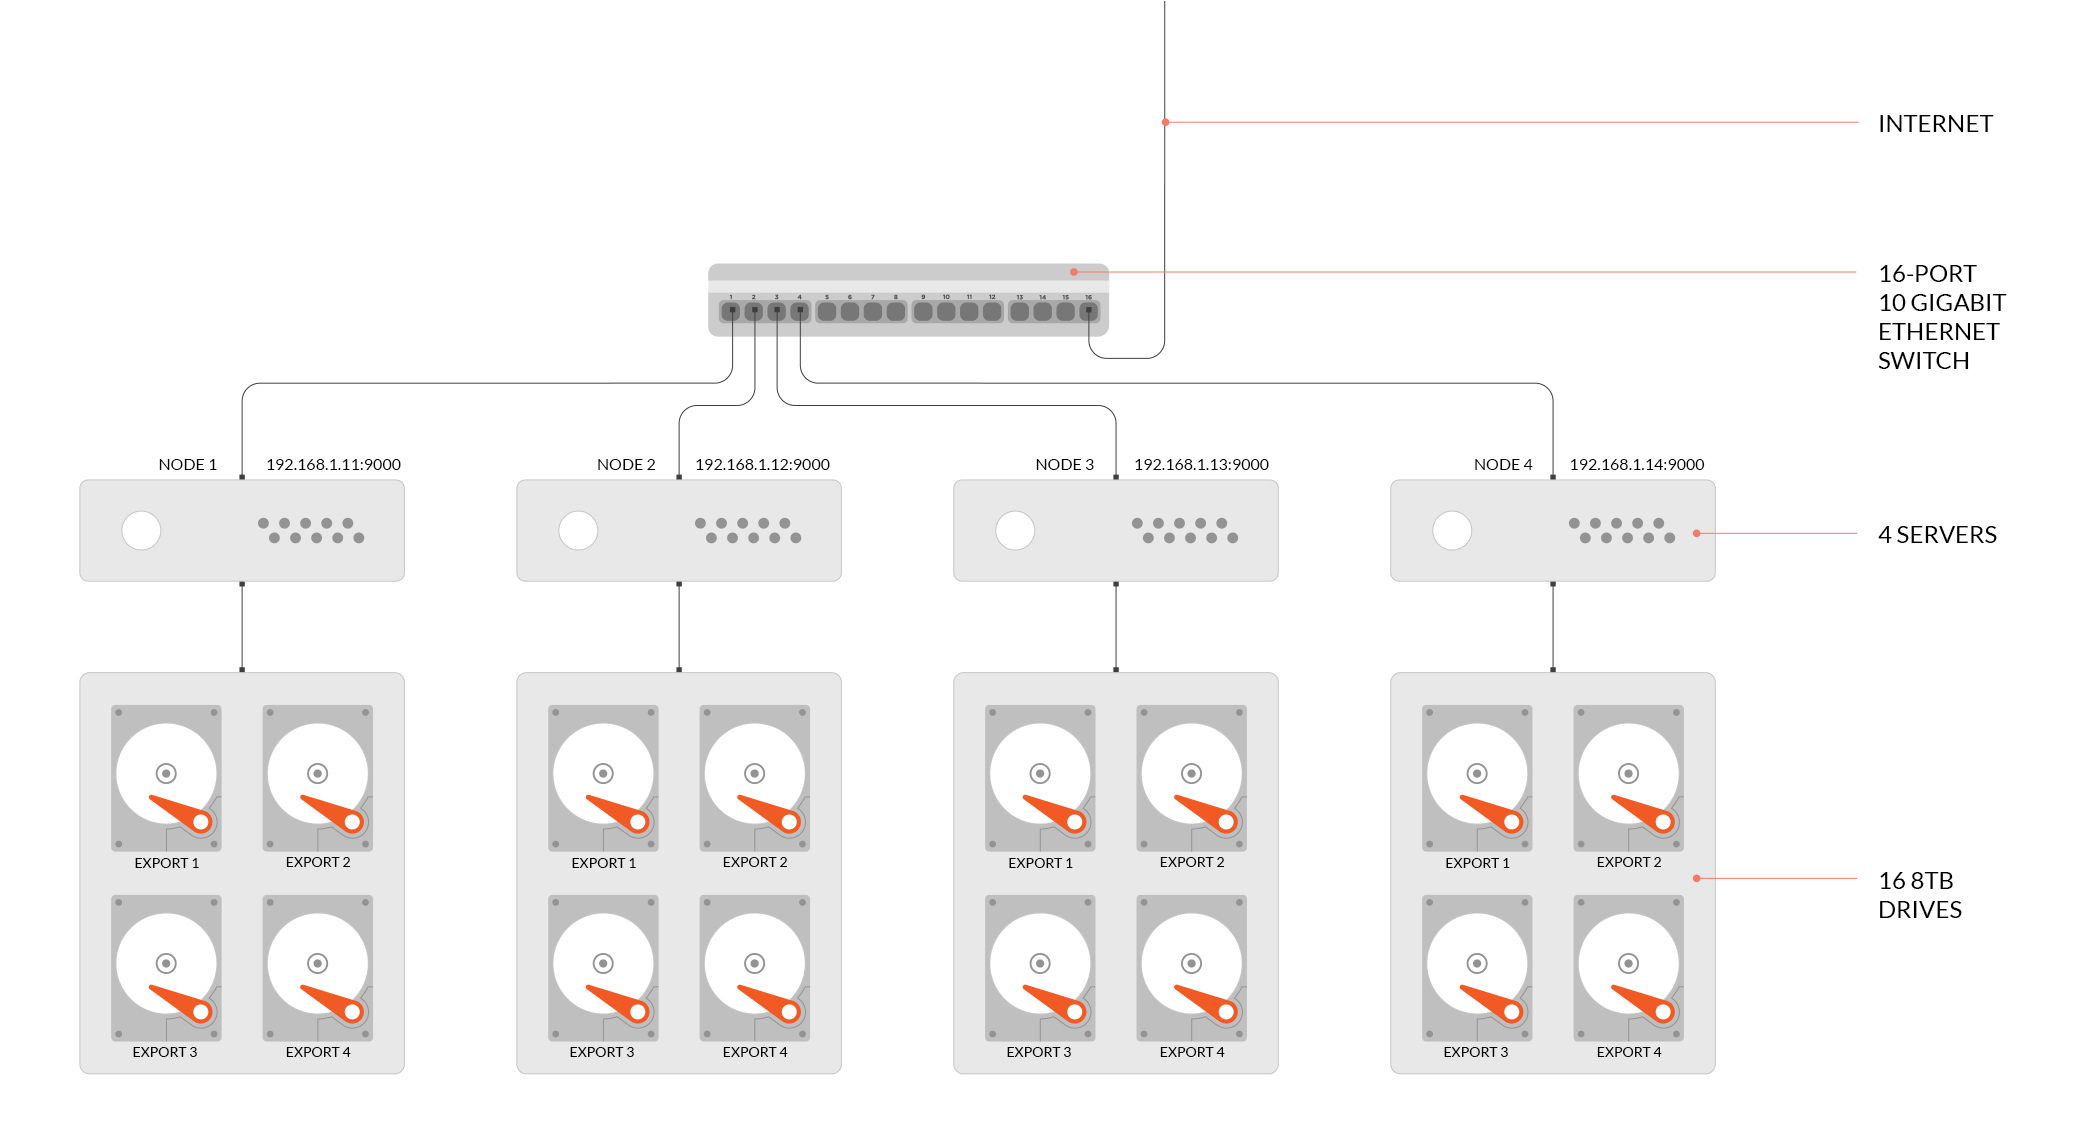
Example 2: Start distributed Minio instance with 4 drives each on 4 nodes, by running this command on all the 4 nodes.
GNU/Linux and macOS
export MINIO_ACCESS_KEY=<ACCESS_KEY>
export MINIO_SECRET_KEY=<SECRET_KEY>
minio server http://192.168.1.11/export1 http://192.168.1.11/export2 \
               http://192.168.1.11/export3 http://192.168.1.11/export4 \
               http://192.168.1.12/export1 http://192.168.1.12/export2 \
               http://192.168.1.12/export3 http://192.168.1.12/export4 \
               http://192.168.1.13/export1 http://192.168.1.13/export2 \
               http://192.168.1.13/export3 http://192.168.1.13/export4 \
               http://192.168.1.14/export1 http://192.168.1.14/export2 \
               http://192.168.1.14/export3 http://192.168.1.14/export4
Windows
set MINIO_ACCESS_KEY=<ACCESS_KEY>
set MINIO_SECRET_KEY=<SECRET_KEY>
minio.exe server http://192.168.1.11/C:/data1 http://192.168.1.11/C:/data2 ^
                  http://192.168.1.11/C:/data3 http://192.168.1.11/C:/data4 ^
                  http://192.168.1.12/C:/data1 http://192.168.1.12/C:/data2 ^
                  http://192.168.1.12/C:/data3 http://192.168.1.12/C:/data4 ^
                  http://192.168.1.13/C:/data1 http://192.168.1.13/C:/data2 ^
                  http://192.168.1.13/C:/data3 http://192.168.1.13/C:/data4 ^
                  http://192.168.1.14/C:/data1 http://192.168.1.14/C:/data2 ^
                  http://192.168.1.14/C:/data3 http://192.168.1.14/C:/data4
3. Test your setup
To test this setup, access the Minio server via browser or mc. You’ll see the combined capacity of all the storage drives as the capacity of this drive.