| .. | ||
| images | ||
| README.md | ||
Disaggregated HDP Spark and Hive with MinIO
1. Cloud-native Architecture
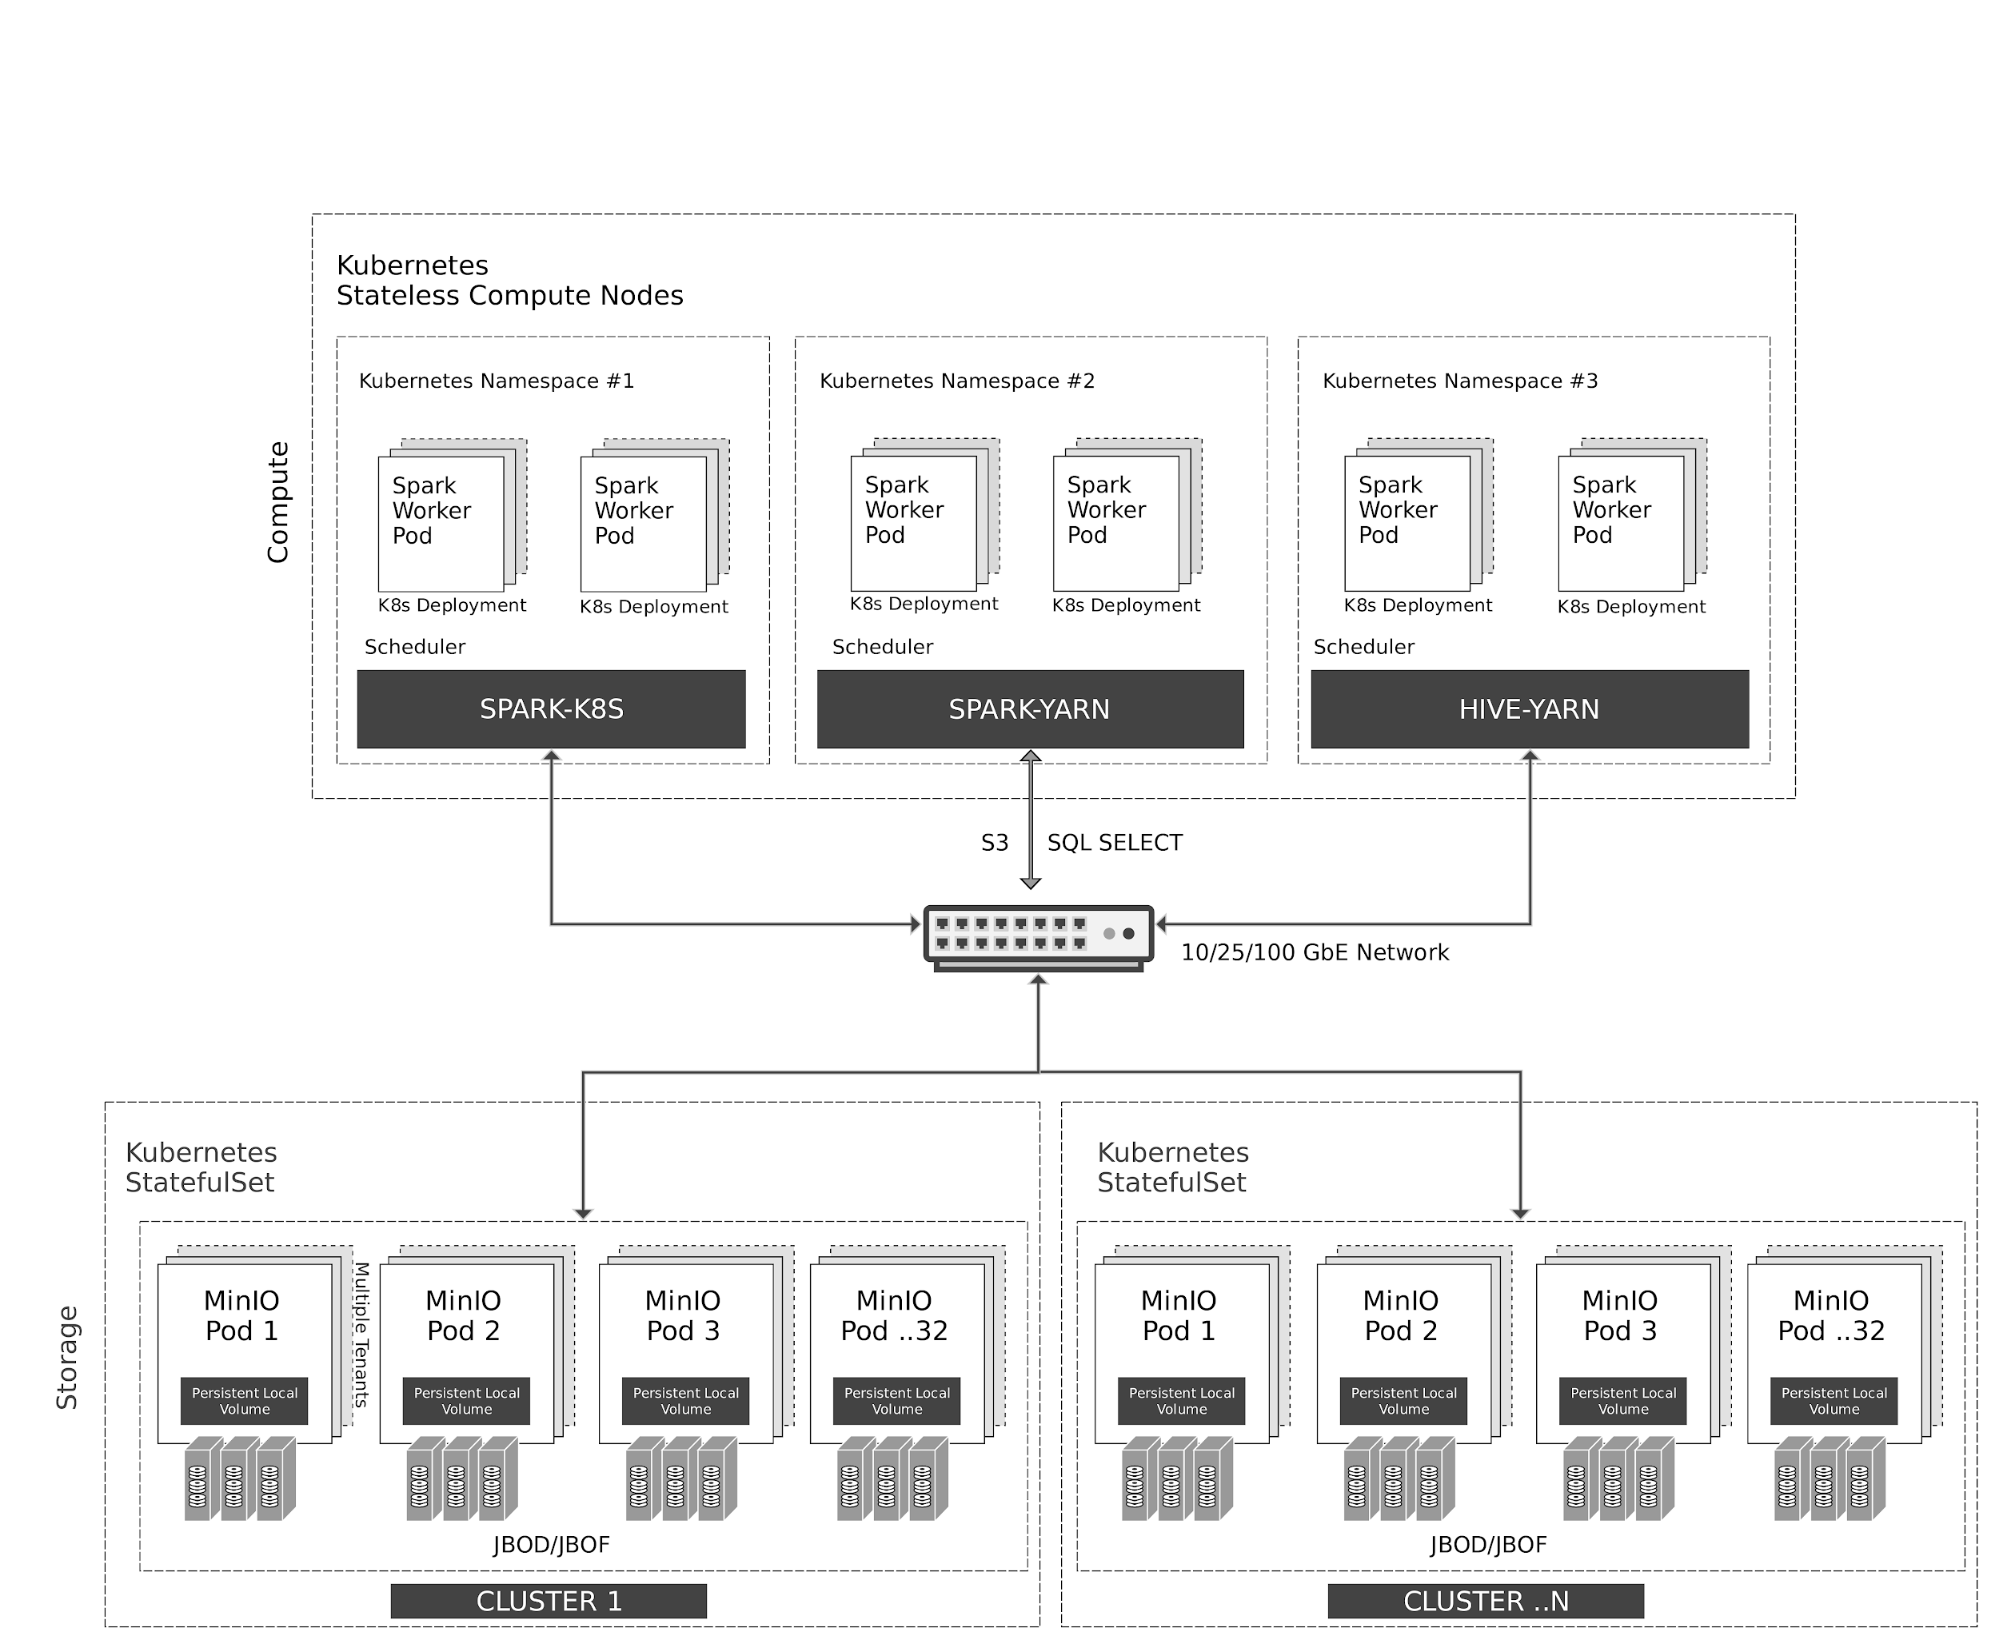
Kubernetes manages stateless Spark and Hive containers elastically on the compute nodes. Spark has native scheduler integration with Kubernetes. Hive, for legacy reasons, uses YARN scheduler on top of Kubernetes.
All access to MinIO object storage is via S3/SQL SELECT API. In addition to the compute nodes, MinIO containers are also managed by Kubernetes as stateful containers with local storage (JBOD/JBOF) mapped as persistent local volumes. This architecture enables multi-tenant MinIO, allowing isolation of data between customers.
MinIO also supports multi-cluster, multi-site federation similar to AWS regions and tiers. Using MinIO Information Lifecycle Management (ILM), you can configure data to be tiered between NVMe based hot storage, and HDD based warm storage. All data is encrypted with per-object key. Access Control and Identity Management between the tenants are managed by MinIO using OpenID Connect or Kerberos/LDAP/AD.
2. Prerequisites
- Install Hortonworks Distribution using this guide.
- Setup Ambari which automatically sets up YARN
- Installing Spark
- Install MinIO Distributed Server using one of the guides below.
3. Configure Hadoop, Spark, Hive to use MinIO
After successful installation navigate to the Ambari UI http://<ambari-server>:8080/ and login using the default credentials: [username: admin, password: admin]

3.1 Configure Hadoop
Navigate to Services -> HDFS -> CONFIGS -> ADVANCED as shown below

Navigate to Custom core-site to configure MinIO parameters for _s3a_ connector

Add the following optimal entries for core-site.xml to configure s3a with MinIO. Most important options here are
- fs.s3a.access.key=minio (Access Key to access MinIO instance, this is obtained after the deployment on k8s)
- fs.s3a.secret.key=minio123 (Secret Key to access MinIO instance, this is obtained after the deployment on k8s)
- fs.s3a.endpoint=
http://minio-address/ - fs.s3a.multipart.size=128M
- fs.s3a.fast.upload=true
- fs.s3a.fast.upload.buffer=bytebuffer
- fs.s3a.path.style.access=true
- fs.s3a.block.size=256M
- fs.s3a.commiter.name=magic
- fs.s3a.committer.magic.enabled=true
- fs.s3a.committer.threads=16
- fs.s3a.connection.maximum=32
- fs.s3a.fast.upload.active.blocks=8
- fs.s3a.max.total.tasks=16
- fs.s3a.threads.core=32
- fs.s3a.threads.max=32
- mapreduce.outputcommitter.factory.scheme.s3a=org.apache.hadoop.fs.s3a.commit.S3ACommitterFactory

The rest of the other optimization options are discussed in the links below
- https://hadoop.apache.org/docs/current/hadoop-aws/tools/hadoop-aws/index.html
- https://hadoop.apache.org/docs/r3.1.1/hadoop-aws/tools/hadoop-aws/committers.html
Once the config changes are applied, proceed to restart Hadoop services.

3.2 Configure Spark2
Navigate to Services -> Spark2 -> CONFIGS as shown below

Navigate to “Custom spark-defaults” to configure MinIO parameters for _s3a_ connector

Add the following optimal entries for spark-defaults.conf to configure Spark with MinIO.
- spark.hadoop.fs.s3a.committer.magic.enabled=true
- spark.hadoop.fs.s3a.committer.name=magic
- spark.hadoop.fs.s3a.impl=org.apache.hadoop.fs.s3a.S3AFileSystem
- spark.hadoop.fs.s3a.path.style.access=true
- spark.hadoop.mapreduce.outputcommitter.factory.scheme.s3a=org.apache.hadoop.fs.s3a.commit.S3ACommitterFactory

Once the config changes are applied, proceed to restart Spark services.

3.3 Configure Hive
Navigate to Services -> Hive -> CONFIGS-> ADVANCED as shown below
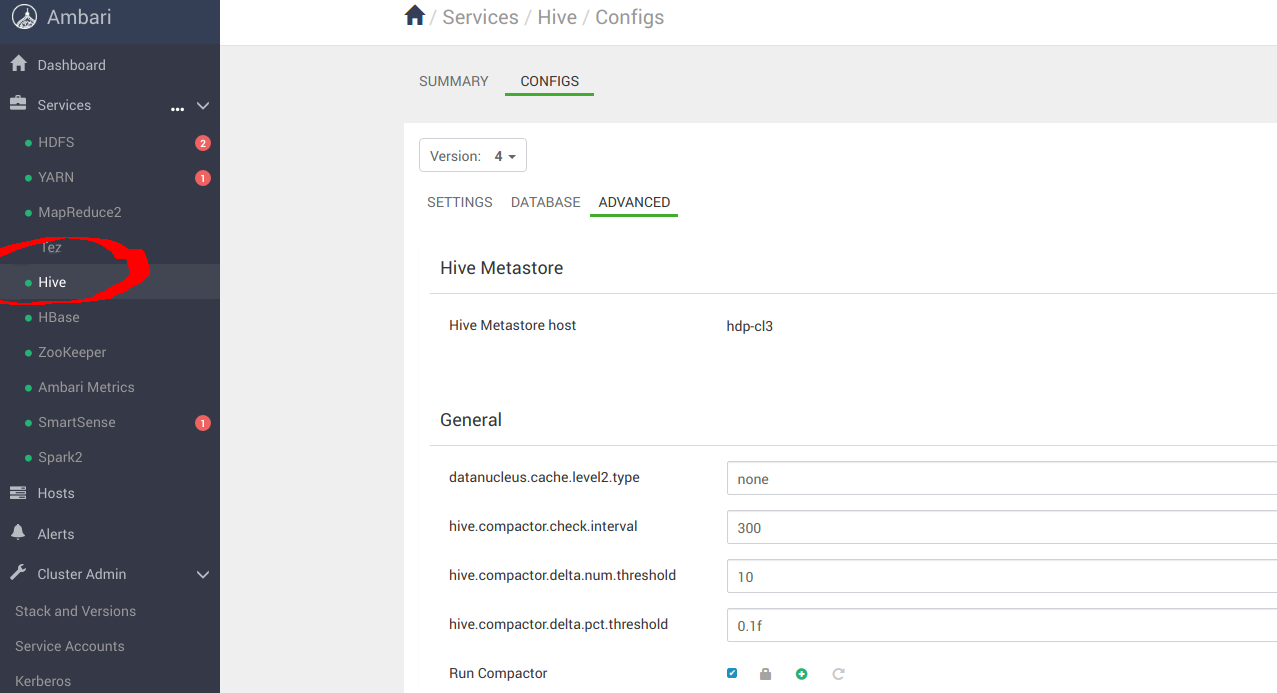
Navigate to “Custom hive-site” to configure MinIO parameters for _s3a_ connector

Add the following optimal entries for hive-site.xml to configure Hive with MinIO.
- hive.blobstore.use.blobstore.as.scratchdir=true
- hive.exec.input.listing.max.threads=50
- hive.load.dynamic.partitions.thread=25
- hive.metastore.fshandler.threads=50
- hive.mv.files.threads=40
- mapreduce.input.fileinputformat.list-status.num-threads=50
For more information about these options please visit https://www.cloudera.com/documentation/enterprise/5-11-x/topics/admin_hive_on_s3_tuning.html

Once the config changes are applied, proceed to restart all Hive services.

4. Run Sample Applications
After installing Hive, Hadoop and Spark successfully, we can now proceed to run some sample applications to see if they are configured appropriately. We can use Spark Pi and Spark WordCount programs to validate our Spark installation. We can also explore how to run Spark jobs from the command line and Spark shell.
4.1 Spark Pi
Test the Spark installation by running the following compute intensive example, which calculates pi by “throwing darts” at a circle. The program generates points in the unit square ((0,0) to (1,1)) and counts how many points fall within the unit circle within the square. The result approximates pi.
Follow these steps to run the Spark Pi example:
- Login as user ‘spark’.
- When the job runs, the library can now use MinIO during intermediate processing.
- Navigate to a node with the Spark client and access the spark2-client directory:
cd /usr/hdp/current/spark2-client
su spark
- Run the Apache Spark Pi job in yarn-client mode, using code from org.apache.spark:
./bin/spark-submit --class org.apache.spark.examples.SparkPi \
    --master yarn-client \
    --num-executors 1 \
    --driver-memory 512m \
    --executor-memory 512m \
    --executor-cores 1 \
    examples/jars/spark-examples*.jar 10
The job should produce an output as shown below. Note the value of pi in the output.
17/03/22 23:21:10 INFO DAGScheduler: Job 0 finished: reduce at SparkPi.scala:38, took 1.302805 s
Pi is roughly 3.1445191445191445
Job status can also be viewed in a browser by navigating to the YARN ResourceManager Web UI and clicking on job history server information.
4.2 WordCount
WordCount is a simple program that counts how often a word occurs in a text file. The code builds a dataset of (String, Int) pairs called counts, and saves the dataset to a file.
The following example submits WordCount code to the Scala shell. Select an input file for the Spark WordCount example. We can use any text file as input.
- Login as user ‘spark’.
- When the job runs, the library can now use MinIO during intermediate processing.
- Navigate to a node with Spark client and access the spark2-client directory:
cd /usr/hdp/current/spark2-client
su spark
The following example uses log4j.properties as the input file:
4.2.1 Upload the input file to HDFS:
hadoop fs -copyFromLocal /etc/hadoop/conf/log4j.properties
          s3a://testbucket/testdata
4.2.2 Run the Spark shell:
./bin/spark-shell --master yarn-client --driver-memory 512m --executor-memory 512m
The command should produce an output as shown below. (with additional status messages):
Spark context Web UI available at http://172.26.236.247:4041
Spark context available as 'sc' (master = yarn, app id = application_1490217230866_0002).
Spark session available as 'spark'.
Welcome to


      ____              __
     / __/__  ___ _____/ /__
    _\ \/ _ \/ _ `/ __/  '_/
   /___/ .__/\_,_/_/ /_/\_\   version 2.1.0.2.6.0.0-598
      /_/

Using Scala version 2.11.8 (Java HotSpot(TM) 64-Bit Server VM, Java 1.8.0_112)
Type in expressions to have them evaluated.
Type :help for more information.

scala>
- At the scala> prompt, submit the job by typing the following commands, Replace node names, file name, and file location with your values:
scala> val file = sc.textFile("s3a://testbucket/testdata")
file: org.apache.spark.rdd.RDD[String] = s3a://testbucket/testdata MapPartitionsRDD[1] at textFile at <console>:24

scala> val counts = file.flatMap(line => line.split(" ")).map(word => (word, 1)).reduceByKey(_ + _)
counts: org.apache.spark.rdd.RDD[(String, Int)] = ShuffledRDD[4] at reduceByKey at <console>:25

scala> counts.saveAsTextFile("s3a://testbucket/wordcount")
Use one of the following approaches to view job output:
View output in the Scala shell:
scala> counts.count()
364
To view the output from MinIO exit the Scala shell. View WordCount job status:
hadoop fs -ls s3a://testbucket/wordcount
The output should be similar to the following:
Found 3 items
-rw-rw-rw-   1 spark spark          0 2019-05-04 01:36 s3a://testbucket/wordcount/_SUCCESS
-rw-rw-rw-   1 spark spark       4956 2019-05-04 01:36 s3a://testbucket/wordcount/part-00000
-rw-rw-rw-   1 spark spark       5616 2019-05-04 01:36 s3a://testbucket/wordcount/part-00001