The dependency graph used to determine the set of resources that
depend on a resource being DBR'd is constructured from the list of
resource states present in the old snapshot. However, the dependencies
of resources that are present in both the old snapshot and the current
plan can be different, which in turn can cause the engine to make
incorrect decisions during DBR with respect to which resources need to
be replaced. For example, consider the following program:

```
var resA = new Resource("a", {dbr: "foo"});
var resB = new Resource("b", {dbr: resA.prop});
```

If this program is then changed to:
```
var resB = new Resource("b", {dbr: "<literal value of resA.prop>"});
var resA = new Resource("a", {dbr: "bar"});
```

The engine will first decide to make no changes to "b", as its input
property values have not changed. "b" has changed, however, such that it
no longer has a dependency on "a".

The engine will then decide to DBR "a". In the process, it will
determine that it first needs to delete "b", because the state for "b"
that is used when calculating "a"'s dependents does not reflect the
changes made during the plan.

To fix this issue, we rely on the observation that dependents can only
have been _removed_ from the base dependency graph: for a dependent to
have been added, it would have had to have been registered prior to the
root--a resource it depends on--which is not a valid operation. This
means that any resources that depend on the root must not yet have
been registered, which in turn implies that resources that have already
been registered must not depend on the root. Thus, we ignore these
resources if they are encountered while walking the old dependency graph
to determine the set of dependents.
|
||
|---|---|---|
| build | ||
| cmd | ||
| dist | ||
| examples | ||
| pkg | ||
| scripts | ||
| sdk | ||
| tests | ||
| .appveyor.yml | ||
| .dockerignore | ||
| .gitignore | ||
| .golangci.yml | ||
| .travis.yml | ||
| .yarnrc | ||
| build.proj | ||
| CHANGELOG.md | ||
| CODE-OF-CONDUCT.md | ||
| CONTRIBUTING.md | ||
| gcp-credentials.json.enc | ||
| go.mod | ||
| go.sum | ||
| LICENSE | ||
| main.go | ||
| Makefile | ||
| README.md | ||
| tslint.json | ||

![]()
![]()


Pulumi's Infrastructure as Code SDK is the easiest way to create and deploy cloud software that use containers, serverless functions, hosted services, and infrastructure, on any cloud.
Simply write code in your favorite language and Pulumi automatically provisions and manages your AWS, Azure, Google Cloud Platform, and/or Kubernetes resources, using an infrastructure-as-code approach. Skip the YAML, and use standard language features like loops, functions, classes, and package management that you already know and love.
For example, create three web servers:
let aws = require("@pulumi/aws");
let sg = new aws.ec2.SecurityGroup("web-sg", {
    ingress: [{ protocol: "tcp", fromPort: 80, toPort: 80, cidrBlocks: ["0.0.0.0/0"]}],
});
for (let i = 0; i < 3; i++) {
    new aws.ec2.Instance(`web-${i}`, {
        ami: "ami-7172b611",
        instanceType: "t2.micro",
        securityGroups: [ sg.name ],
        userData: `#!/bin/bash
            echo "Hello, World!" > index.html
            nohup python -m SimpleHTTPServer 80 &`,
    });
}
Or a simple serverless timer that archives Hacker News every day at 8:30AM:
const aws = require("@pulumi/aws");

const snapshots = new aws.dynamodb.Table("snapshots", {
    attributes: [{ name: "id", type: "S", }],
    hashKey: "id", billingMode: "PAY_PER_REQUEST",
});

aws.cloudwatch.onSchedule("daily-yc-snapshot", "cron(30 8 * * ? *)", () => {
    require("https").get("https://news.ycombinator.com", res => {
        let content = "";
        res.setEncoding("utf8");
        res.on("data", chunk => content += chunk);
        res.on("end", () => new aws.sdk.DynamoDB.DocumentClient().put({
            TableName: snapshots.name.get(),
            Item: { date: Date.now(), content },
        }).promise());
    }).end();
});
Many examples are available spanning containers, serverless, and infrastructure in pulumi/examples.
Pulumi is open source under the Apache 2.0 license, supports many languages and clouds, and is easy to extend. This
repo contains the pulumi CLI, language SDKs, and core Pulumi engine, and individual libraries are in their own repos.
Welcome
-
Getting Started: get up and running quickly.
-
Tutorials: walk through end-to-end workflows for creating containers, serverless functions, and other cloud services and infrastructure.
-
Examples: browse a number of useful examples across many languages, clouds, and scenarios including containers, serverless, and infrastructure.
-
Reference Docs: read conceptual documentation, in addition to details on how to configure Pulumi to deploy into your AWS, Azure, or Google Cloud accounts, and/or Kubernetes cluster.
-
Community Slack: join us over at our community Slack channel. Any and all discussion or questions are welcome.
-
Roadmap: check out what's on the roadmap for the Pulumi project over the coming months.
Getting Started
See the Get Started guide to quickly get started with Pulumi on your platform and cloud of choice.
Otherwise, the following steps demonstrate how to deploy your first Pulumi program, using AWS Serverless Lambdas, in minutes:
-
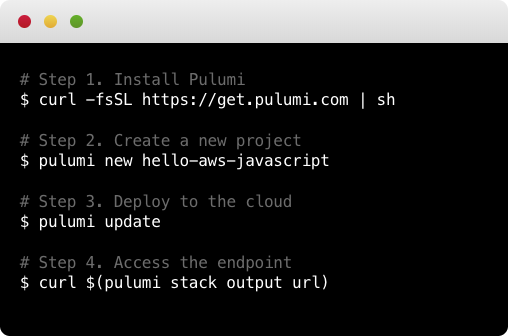
Install:
To install the latest Pulumi release, run the following (see full installation instructions for additional installation options):
$ curl -fsSL https://get.pulumi.com/ | sh -
Create a Project:
After installing, you can get started with the
pulumi newcommand:$ mkdir pulumi-demo && cd pulumi-demo $ pulumi new hello-aws-javascriptThe
newcommand offers templates for all languages and clouds. Run it without an argument and it'll prompt you with available projects. This command created an AWS Serverless Lambda project written in JavaScript. -
Deploy to the Cloud:
Run
pulumi upto get your code to the cloud:$ pulumi upThis makes all cloud resources needed to run your code. Simply make edits to your project, and subsequent
pulumi ups will compute the minimal diff to deploy your changes. -
Use Your Program:
Now that your code is deployed, you can interact with it. In the above example, we can curl the endpoint:
$ curl $(pulumi stack output url) -
Access the Logs:
If you're using containers or functions, Pulumi's unified logging command will show all of your logs:
$ pulumi logs -f -
Destroy your Resources:
After you're done, you can remove all resources created by your program:
$ pulumi destroy -y
To learn more, head over to pulumi.com for much more information, including tutorials, examples, and details of the core Pulumi CLI and programming model concepts.
Platform
CLI
| Architecture | Build Status |
|---|---|
| Linux/macOS x64 |  |
| Windows x64 |
Languages
| Language | Status | Runtime | |
|---|---|---|---|
| JavaScript | Stable | Node.js 8+ | |
| TypeScript | Stable | Node.js 8+ | |
| Python | Stable | Python 3.6+ | |
| Go | Preview | Go 1.x |
Clouds
See Supported Clouds for the full list of supported cloud and infrastructure providers.
Contributing
Please See CONTRIBUTING.md for information on building Pulumi from source or contributing improvements.