30 KiB
Neural Collaborative Filtering (NCF) for TensorFlow
This repository provides a script and recipe to train Neural Collaborative Filtering to achieve state of the art accuracy, and is tested and maintained by NVIDIA.
Table of Contents
- Model overview
- Setup
- Quick Start Guide
- Advanced
- Performance
- Release Notes
Model overview
The Neural Collaborative Filtering (NCF) model is a neural network that provides collaborative filtering based on implicit feedback. Specifically, it provides product recommendations based on user and item interactions. The training data for this model should contain a sequence of (user ID, item ID) pairs indicating that the specified user has interacted with an item, for example, by giving a rating or clicking. NCF was first described by Xiangnan He, Lizi Liao, Hanwang Zhang, Liqiang Nie, Xia Hu and Tat-Seng Chua in the Neural Collaborative Filtering paper.
The implementation in this repository focuses on the NeuMF instantiation of the NCF architecture. We modified it to use Dropout in the fully connected layers. This reduces overfitting and increases the final accuracy. Training the other two instantiations of NCF (GMF and MLP) is not supported.
The original paper evaluates the model on the ml-1m dataset. Conversely, we evaluate on the ml-20m dataset, which provides a more practical production scenario. However, using the ml-1m dataset is also supported.
This model takes advantage of the mixed precision Tensor Cores found on Volta, Turing, and the NVIDIA Ampere GPU architectures demonstrating the reduction in training time possible by leveraging Tensor Cores. In the single GPU configuration, training times can be improved close to 1.6x through the usage of Tensor Cores.
This model is tested against each NGC monthly container release to ensure consistent accuracy and performance over time.
Model architecture
NCF-TF takes in a sequence of (user ID, item ID) pairs as inputs, then feeds them separately into a matrix factorization step (where the embeddings are multiplied) and into a multilayer perceptron (MLP) network.
The outputs of the matrix factorization and the MLP network are then combined and fed into a single dense layer which predicts whether the input user is likely to interact with the input item. The architecture of the MLP network is shown below.
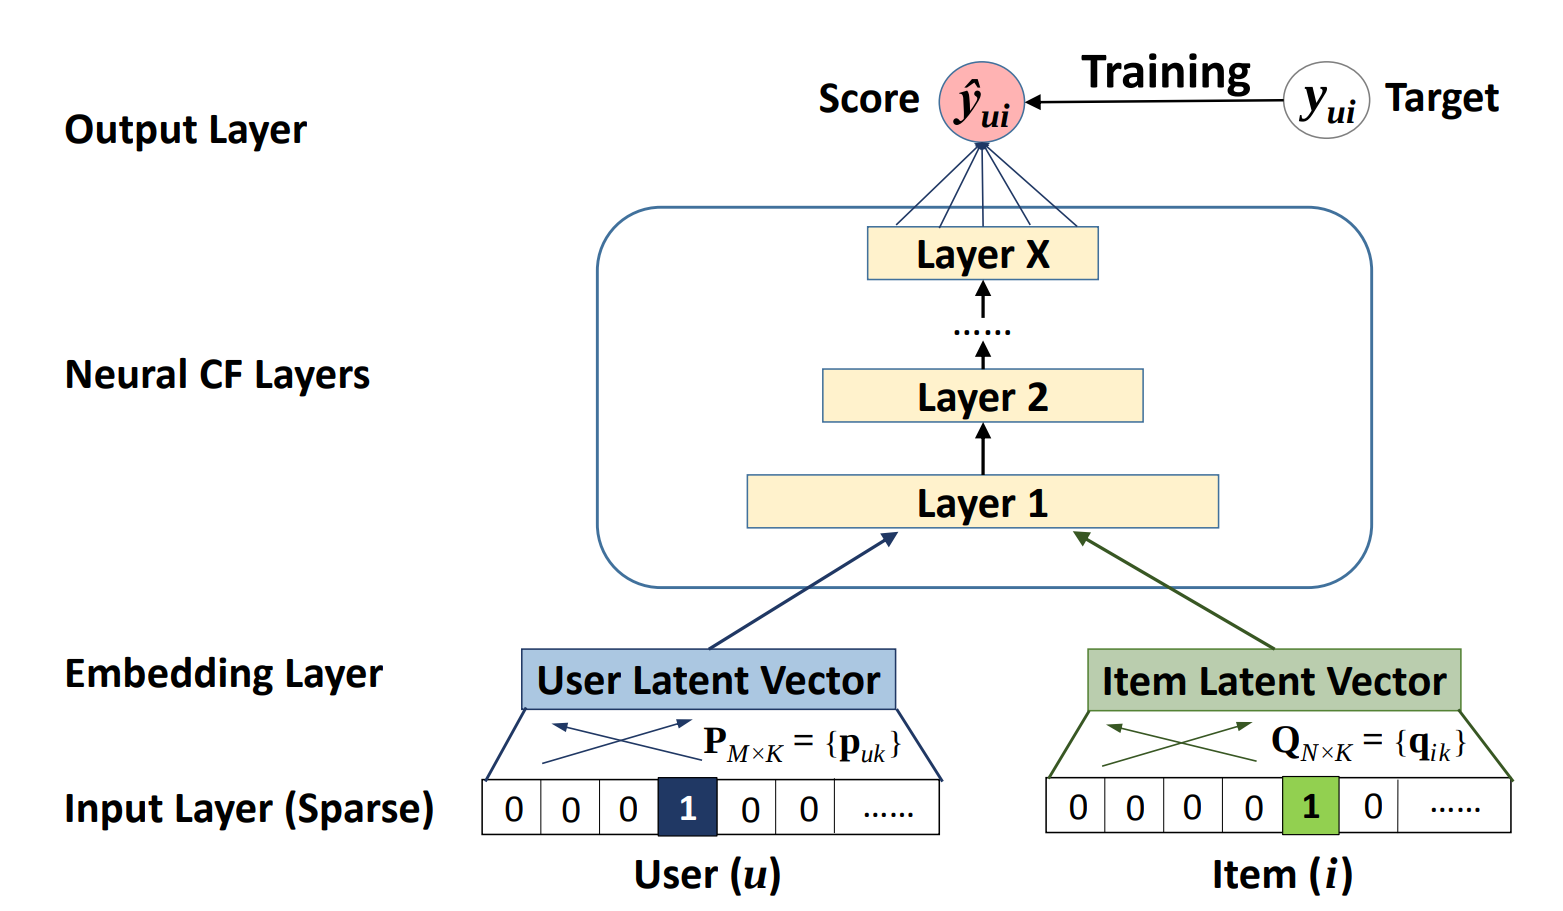
Figure 1. The architecture of a Neural Collaborative Filtering model. Taken from the Neural Collaborative Filtering paper.
Default Configuration
This implementation has the following features:
- model-parallel multi-gpu training with Horovod
- mixed precision training with TF-AMP (TensorFlow-Automatic Mixed Precision), which enables mixed precision training without any changes to the code-base by performing automatic graph rewrites and loss scaling controlled by an environmental variable
- fast negative sample generation and data preprocessing with CuPy
- Before each training epoch, the training data is augmented with randomly generated negatives samples. A “shortcut” is enabled by default where the script does not verify that the randomly generated samples are actually negative samples. We have found that this shortcut has a low impact on model accuracy while considerably improving the speed and memory footprint of the data augmentation stage of training.
- Note: The negative samples generated for the test set are always verified regardless of the shortcut being enabled or not.
Feature support matrix
| Feature | NCF-TF |
|---|---|
| Horovod | Yes |
| Automatic mixed precision (AMP) | Yes |
Features
Horovod
Horovod is a distributed training framework for TensorFlow, Keras, PyTorch and MXNet. The goal of Horovod is to make distributed deep learning fast and easy to use. For more information about how to get started with Horovod, see the Horovod: Official repository.
Multi-GPU training with Horovod
Our model uses Horovod to implement efficient multi-GPU training with NCCL. For details, see example sources in this repository or see the TensorFlow tutorial.
Automatic Mixed Precision (AMP)
Computation graphs can be modified by TensorFlow on runtime to support mixed precision training. Detailed explanation of mixed precision can be found in the next section.
Mixed precision training
Mixed precision is the combined use of different numerical precisions in a computational method. Mixed precision training offers significant computational speedup by performing operations in half-precision format while storing minimal information in single-precision to retain as much information as possible in critical parts of the network. Since the introduction of Tensor Cores in Volta, and following with both the Turing and Ampere architectures, significant training speedups are experienced by switching to mixed precision -- up to 3x overall speedup on the most arithmetically intense model architectures. Using mixed precision training previously required two steps:
- Porting the model to use the FP16 data type where appropriate.
- Adding loss scaling to preserve small gradient values.
This can now be achieved using Automatic Mixed Precision (AMP) for TensorFlow to enable the full mixed precision methodology in your existing TensorFlow model code. AMP enables mixed precision training on Volta, Turing, and NVIDIA Ampere GPU architectures automatically. The TensorFlow framework code makes all necessary model changes internally.
In TF-AMP, the computational graph is optimized to use as few casts as necessary and maximize the use of FP16, and the loss scaling is automatically applied inside of supported optimizers. AMP can be configured to work with the existing tf.contrib loss scaling manager by disabling the AMP scaling with a single environment variable to perform only the automatic mixed-precision optimization. It accomplishes this by automatically rewriting all computation graphs with the necessary operations to enable mixed precision training and automatic loss scaling.
For information about:
- How to train using mixed precision, see the Mixed Precision Training paper and Training With Mixed Precision documentation.
- Techniques used for mixed precision training, see the Mixed-Precision Training of Deep Neural Networks blog.
- How to access and enable AMP for TensorFlow, see Using TF-AMP from the TensorFlow User Guide.
Enabling mixed precision
Mixed precision is enabled in TensorFlow by using the Automatic Mixed Precision (TF-AMP) extension which casts variables to half-precision upon retrieval, while storing variables in single-precision format. Furthermore, to preserve small gradient magnitudes in backpropagation, a loss scaling step must be included when applying gradients. In TensorFlow, loss scaling can be applied statically by using simple multiplication of loss by a constant value or automatically, by TF-AMP. Automatic mixed precision makes all the adjustments internally in TensorFlow, providing two benefits over manual operations. First, programmers need not modify network model code, reducing development and maintenance effort. Second, using AMP maintains forward and backward compatibility with all the APIs for defining and running TensorFlow models.
To enable mixed precision, you can simply add the values to the environmental variables inside your training script:
-
Enable TF-AMP graph rewrite:
os.environ["TF_ENABLE_AUTO_MIXED_PRECISION_GRAPH_REWRITE"] = "1" -
Enable Automated Mixed Precision:
os.environ['TF_ENABLE_AUTO_MIXED_PRECISION'] = '1'
Enabling TF32
TensorFloat-32 (TF32) is the new math mode in NVIDIA A100 GPUs for handling the matrix math also called tensor operations. TF32 running on Tensor Cores in A100 GPUs can provide up to 10x speedups compared to single-precision floating-point math (FP32) on Volta GPUs.
TF32 Tensor Cores can speed up networks using FP32, typically with no loss of accuracy. It is more robust than FP16 for models which require high dynamic range for weights or activations.
For more information, refer to the TensorFloat-32 in the A100 GPU Accelerates AI Training, HPC up to 20x blog post.
TF32 is supported in the NVIDIA Ampere GPU architecture and is enabled by default.
Setup
The following section lists the requirements that you need to meet in order to start training NCF-TF.
Requirements
This repository contains Dockerfile which extends the TensorFlow NGC container and encapsulates some dependencies. Aside from these dependencies, ensure you have the following components:
- NVIDIA Docker
- TensorFlow 20.07-py3+ NGC container
- Supported GPUs:
For more information about how to get started with NGC containers, see the following sections from the NVIDIA GPU Cloud Documentation and the Deep Learning Documentation:
For those unable to use the [framework name] NGC container, to set up the required environment or create your own container, see the versioned NVIDIA Container Support Matrix.
Quick Start Guide
To train your model using mixed or TF32 precision with Tensor Cores or using FP32, perform the following steps using the default parameters of the NCF model on the ml-20m dataset.
-
Clone the repository.
git clone https://github.com/NVIDIA/DeepLearningExamples cd DeepLearningExamples/TensorFlow/Recommendation/NCF -
Build the NCF TensorFlow NGC container.
After Docker is correctly set up, you can build the NCF image with:
docker build . -t nvidia_ncf -
Launch the NCF TensorFlow Docker container.
mkdir data
docker run --runtime=nvidia -it --rm --ipc=host -v ${PWD}/data:/data nvidia_ncf bash
This will launch the container and mount the
./datadirectory as a volume to the/datadirectory inside the container. Any datasets and experiment results (logs, checkpoints etc.) saved to/datawill be accessible in the./datadirectory on the host. -
Download and preprocess the dataset.
ml-20m
Preprocessing consists of downloading the data, filtering out users that have less than 20 ratings (by default), sorting the data and dropping the duplicates. No data augmentation techniques are used in the preprocessing stage.
To download and preprocess the ml-20m dataset, run:
./prepare_dataset.shml-1m
To download and preprocess the ml-1m dataset, run:
./prepare_dataset.sh ml-1mThis will store the preprocessed training and evaluation data in the
/datadirectory, so that it can be later used to train the model (by passing the appropriate--dataargument to thencf.pyscript). -
Start the training.
After the Docker container is launched, the training with the default hyper-parameters can be started with:
mpirun -np 4 --allow-run-as-root python ncf.py --amp --data /data/cache/ml-20m --checkpoint-dir /data/checkpoints/After the training is complete, the model parameters that provide the best evaluation accuracy are saved to the directory passed to the
--checkpoint-dirargument. By default, this will be in the/data/checkpoints/directory. -
Perform a validation/evaluation.
To run evaluation on a specific checkpoint, simply run the following command:
python ncf.py --data /data/cache/ml-20m --mode test --load-checkpoint-path /data/checkpoints/model.ckptNote: TensorFlow checkpoints consist of three files each with a
*.ckptprefix.
Advanced
The following sections provide greater details of the dataset, running training and inference, and the training results.
Command Line Arguments
To see the full list of available options and their descriptions, use the -h or --help command line option, for
example:
python ncf.py --help
Aside from options to set hyperparameters, the relevant options to control the behavior of the script are:
--data DATA           path to test and training data files
-e EPOCHS, --epochs EPOCHS
                      number of epochs to train for
-b BATCH_SIZE, --batch-size BATCH_SIZE
                      number of examples for each iteration
--valid-users-per-batch VALID_USERS_PER_BATCH
                      Number of users tested in each evaluation batch
-n NEGATIVE_SAMPLES, --negative-samples NEGATIVE_SAMPLES
                      number of negative examples per interaction
-k TOPK, --topk TOPK  rank for test examples to be considered a hit
--amp                 enable half-precision computations using automatic
                      mixed precision (only available in supported
                      containers)
--xla                 enable TensorFlow XLA (Accelerated Linear Algebra)
--valid-negative VALID_NEGATIVE
                      Number of negative samples for each positive test
                      example
--loss-scale LOSS_SCALE
                      Loss scale value to use when manually enabling mixed precision training
--checkpoint-dir CHECKPOINT_DIR
                      Path to store the result checkpoint file for training, or to read from for evaluation
--mode {train,test}   Passing "test" will only run a single evaluation,
                      otherwise full training will be performed
--no-neg-trick        do not use negative sample generation shortcut to
                      speed up preprocessing (will increase GPU memory
                      consumption)
--eval-after EVAL_AFTER
                      Perform evaluations only after this many epochs
--verbose             Log the performance and accuracy after every epoch
Getting the Data
For each user, the test dataset is generated by removing one movie the user has
interacted with. For each removed movie, the data is augmented with a large
number of movies (corresponding to the --valid-negative option) that the user
has not interacted with.
The repository contains the prepare_dataset.sh that will preprocess the training and test datasets.
By default, the data will be downloaded to the /data directory.
Multi-dataset
This implementation is tuned for the ml-20m and ml-1m datasets. Using other datasets might require tuning some hyperparameters (for example, learning rate, beta1, beta2).
If you'd like to use your custom dataset, you can do so by adding support for
it in the prepare_dataset.sh and download_dataset.sh scripts. The required
format of the data is a CSV file which should follow the pattern outlined
below:
userId, movieId
1,2
1,10
...
The CSV file may contain additional columns with extra features such as ratings
and timestamps, but only the userId and movieId columns are required.
The performance of the model depends on the dataset size. Generally, the model should scale better for datasets containing more data points. For a smaller dataset, you might experience slower performance as fixed cost operations that do not scale with input size will have a larger impact. Furthermore, it will be difficult for the model to converge.
Training Process
The training can be launched with the ncf.py script. This script will train the
NCF model for a number of epochs specified by the --epochs argument, which has
a default value of 30.
During training, the script will begin logging after the number of epochs
specified by the --eval-after option. After that the script will output a line like the one below:
DLL 2020-07-03 10:58:43.371321 - (26,) train_time : 9.889576196670532 eval_time : 0.674187183380127 hr@10 : 0.9526329850606168 ndcg : 0.7448715819572108
The evaluation metrics are: HR (hit rate), and NDCG (normalized discounted
cumulative gain). In the evaluation set, each user will be assigned one item
that they have actually interacted with, and a number (by default 99) of items
that they have not interacted with. For each user, the evaluation process will
rank each of the items assigned to that user based on the user’s likeliness to
interact with the items. The hit rate measures the percentage of users for
which the item that they have interacted with is ranked within the top k items,
where k is a number (by default 10) specified by the -k option. NDCG has a
similar meaning, except the rank of the positive item is taken into account.
Typically, HR is used as the primary evaluation metric.
Additionally, the model parameters that give the best accuracy in validation
will be stored at the directory pointed to by the --checkpoint-dir argument.
Multiple GPUs can be used for training through Horovod. The number of GPUs can
be controlled by the -np parameter passed to mpirun.
Evaluation Process
The evaluation process can be run by the ncf.py script as well. By passing the
--mode=test argument, the script will run evaluation once using the TensorFlow
checkpoint specified by the --checkpoint-dir file.
Performance
The performance measurements in this document were conducted at the time of publication and may not reflect the performance achieved from NVIDIA’s latest software release. For the most up-to-date performance measurements, go to NVIDIA Data Center Deep Learning Product Performance.
Benchmarking
The following section shows how to run benchmarks measuring the model performance in training and inference modes.
Performance Benchmark
To benchmark the training and inference performance, run:
mpirun -np 1 --allow-run-as-root python ncf.py --data /data/cache/ml-20m
By default, the ncf.py script outputs metrics describing the following:
- Training speed and throughput
- Evaluation speed and throughput
Results
The following sections provide details on how we achieved our performance and accuracy in training and inference.
All throughput numbers are reported in millions of samples per second while time-to-train numbers are in seconds.
Training accuracy results
For all the sections below, our results were obtained by running:
mpirun -np <number_of_GPUs> --allow-run-as-root python ncf.py [--amp] --data /data/cache/ml-20m
in the TensorFlow-1 20.07 NGC container.
Training accuracy: NVIDIA DGX A100 (8x A100 40GB)
| GPUs | Batch size / GPU | Accuracy - TF32 | Accuracy - mixed precision | Time to train - TF32 [s] | Time to train - mixed precision [s] | Time to train speedup (TF32 to mixed precision) |
|---|---|---|---|---|---|---|
| 1 | 1,048,576 | 0.9588 | 0.9589 | 59.4 | 53.1 | 1.12 |
| 4 | 262,144 | 0.9588 | 0.9590 | 22.8 | 21.5 | 1.06 |
| 8 | 131,072 | 0.9587 | 0.9589 | 19.8 | 20.2 | 0.98 |
Training accuracy: NVIDIA DGX-1 (8x V100 32GB)
| GPUs | Batch size / GPU | Accuracy - FP32 | Accuracy - mixed precision | Time to train - FP32 | Time to train - mixed precision | Time to train speedup (FP32 to mixed precision) |
|---|---|---|---|---|---|---|
| 1 | 1,048,576 | 0.9583 | 0.9589 | 120.9 | 91.6 | 1.32 |
| 4 | 262,144 | 0.9589 | 0.9583 | 43.7 | 31.8 | 1.37 |
| 8 | 131,072 | 0.9590 | 0.9588 | 26.2 | 21.9 | 1.20 |
Training Performance Results
For all the sections below, our results were obtained by running:
mpirun -np <number_of_GPUs> --allow-run-as-root python ncf.py [--amp] --data /data/cache/ml-20m
in the TensorFlow-1 20.07 NGC container.
Training performance: NVIDIA DGX A100 (8x A100 40GB)
| GPUs | Batch size / GPU | Throughput - TF32 | Throughput - mixed precision | Throughput speedup (TF32 - mixed precision) | Strong scaling - TF32 | Strong scaling - mixed precision |
|---|---|---|---|---|---|---|
| 1 | 1,048,576 | 20.18 | 22.84 | 1.132 | 1 | 1 |
| 4 | 262,144 | 60.34 | 62.70 | 1.039 | 2.99 | 2.75 |
| 8 | 131,072 | 89.88 | 80.86 | 0.900 | 4.45 | 3.54 |
Training performance: NVIDIA DGX-1 (8x V100 32GB)
| GPUs | Batch size / GPU | Throughput - FP32 | Throughput - mixed precision | Throughput speedup (FP32 - mixed precision) | Strong scaling - FP32 | Strong scaling - mixed precision |
|---|---|---|---|---|---|---|
| 1 | 1,048,576 | 9.73 | 15.21 | 1.563 | 1 | 1 |
| 4 | 262,144 | 30.31 | 39.47 | 1.302 | 3.11 | 2.60 |
| 8 | 131,072 | 50.91 | 59.13 | 1.161 | 5.23 | 3.89 |
Inference Performance Results
Our results were obtained by running the inference.py script in the PyTorch 20.07 NGC container.
Throughput is reported in millions of samples per second while latency is reported in seconds.
Inference performance: NVIDIA DGX A100 (1x A100 40GB)
TF32
| Batch size | Throughput Avg | Latency Avg | Latency 90% | Latency 95% | Latency 99% |
|---|---|---|---|---|---|
| 1,024 | 1.67 | 0.0006 | 0.0006 | 0.0007 | 0.0007 |
| 4,096 | 6.02 | 0.0007 | 0.0007 | 0.0007 | 0.0007 |
| 16,384 | 19.01 | 0.0009 | 0.0009 | 0.0009 | 0.0009 |
| 65,536 | 34.91 | 0.0019 | 0.0019 | 0.0019 | 0.0019 |
| 262,144 | 44.72 | 0.0059 | 0.0063 | 0.0063 | 0.0066 |
| 1,048,576 | 47.22 | 0.0222 | 0.0230 | 0.0232 | 0.0237 |
FP16
| Batch size | Throughput Avg | Latency Avg | Latency 90% | Latency 95% | Latency 99% |
|---|---|---|---|---|---|
| 1,024 | 1.34 | 0.0008 | 0.0008 | 0.0008 | 0.0008 |
| 4,096 | 5.23 | 0.0008 | 0.0008 | 0.0008 | 0.0008 |
| 16,384 | 17.61 | 0.0009 | 0.0009 | 0.0010 | 0.0010 |
| 65,536 | 38.63 | 0.0017 | 0.0017 | 0.0018 | 0.0018 |
| 262,144 | 55.36 | 0.0047 | 0.0049 | 0.0050 | 0.0051 |
| 1,048,576 | 59.48 | 0.0176 | 0.0178 | 0.0179 | 0.0184 |
Inference performance: NVIDIA DGX-1 (8x V100 32GB)
FP32
| Batch size | Throughput Avg | Latency Avg | Latency 90% | Latency 95% | Latency 99% |
|---|---|---|---|---|---|
| 1,024 | 0.79 | 0.0013 | 0.0015 | 0.0015 | 0.0016 |
| 4,096 | 2.88 | 0.0014 | 0.0016 | 0.0016 | 0.0017 |
| 16,384 | 8.38 | 0.0020 | 0.0021 | 0.0021 | 0.0024 |
| 65,536 | 16.77 | 0.0039 | 0.0041 | 0.0041 | 0.0041 |
| 262,144 | 22.53 | 0.0116 | 0.0118 | 0.0119 | 0.0122 |
| 1,048,576 | 25.14 | 0.0417 | 0.0425 | 0.0431 | 0.0440 |
FP16
| Batch size | Throughput Avg | Latency Avg | Latency 90% | Latency 95% | Latency 99% |
|---|---|---|---|---|---|
| 1,024 | 0.69 | 0.0015 | 0.0017 | 0.0017 | 0.0018 |
| 4,096 | 2.64 | 0.0016 | 0.0017 | 0.0017 | 0.0018 |
| 16,384 | 8.84 | 0.0019 | 0.0020 | 0.0020 | 0.0021 |
| 65,536 | 21.43 | 0.0031 | 0.0032 | 0.0032 | 0.0032 |
| 262,144 | 33.61 | 0.0078 | 0.0080 | 0.0081 | 0.0083 |
| 1,048,576 | 38.83 | 0.0270 | 0.0276 | 0.0277 | 0.0286 |
Release Notes
Changelog
June 2020
- Updated performance tables to include A100 results
March 2019
- Initial Release
Known Issues
AMP speedup for Ampere
In this model the TF32 precision can in some cases be as fast as the FP16 precision on Ampere GPUs. This is because TF32 also uses Tensor Cores and doesn't need any additional logic such as maintaining FP32 master weights and casts. However, please note that NCF is, by modern recommender standards, a very small model. Larger models should still see significant benefits of using FP16 math.
Multi-GPU Scaling Efficiency
Currently, this model does not exhibit good scaling efficiency when scaling to 4 and 8 GPUs. Since we could not find hyper-parameters that could hit the target accuracy for batch size of over 1 million samples, we elected to use a strong scaling strategy which generally has worse scaling efficiency compared to a more common weak scaling strategy. Additionally, we believe that the small dataset size does not facilitate great scaling. However, the training scripts allow the use of custom datasets provided they are in the correct format.
Scaling beyond 8 GPUs
Neural Collaborative Filtering (NCF) is a relatively lightweight model that trains quickly with this relatively smaller dataset, ml-20m. Because of the smaller dataset, the high ratio of communication to computation makes it difficult to efficiently use more than 8 GPUs. Typically, this is not an issue because when using 8 GPUs with FP16 precision the training is sufficiently fast. However, if you would like to scale the training to 16 GPUs and beyond, you might try modifying the model so that the communication to computation ratio facilitates better scaling. This could be done, for example, by finding hyper-parameters that enable using a larger global batch size.
Preprocessing Out-of-Memory with 16GB GPUs
When running on GPUs with 16GB of memory, ensure the --no-neg-trick flag is
not set. Otherwise, the data augmentation stage of training will consume
too much GPU memory, causing TensorFlow to raise an out-of-memory error.
This flag, when it is not set, reduces memory consumption in the negative samples generation phase of training by telling the script not to verify that the randomly generated samples are actually negative samples (verification still occurs for negative samples generated for the test set). Therefore, there is no need to keep the data structures used to verify negative samples in memory during training.