31 KiB
User manual 🎓
- User manual 🎓
Usage ❓
termscp can be started with the following options:
termscp [options]... [protocol://user@address:port:wrkdir] [local-wrkdir]
-P, --password <password>if address is provided, password will be this argument-c, --configOpen termscp starting from the configuration page-q, --quietDisable logging-t, --theme <path>Import specified theme-u, --updateUpdate termscp to latest version-v, --versionPrint version info-h, --helpPrint help page
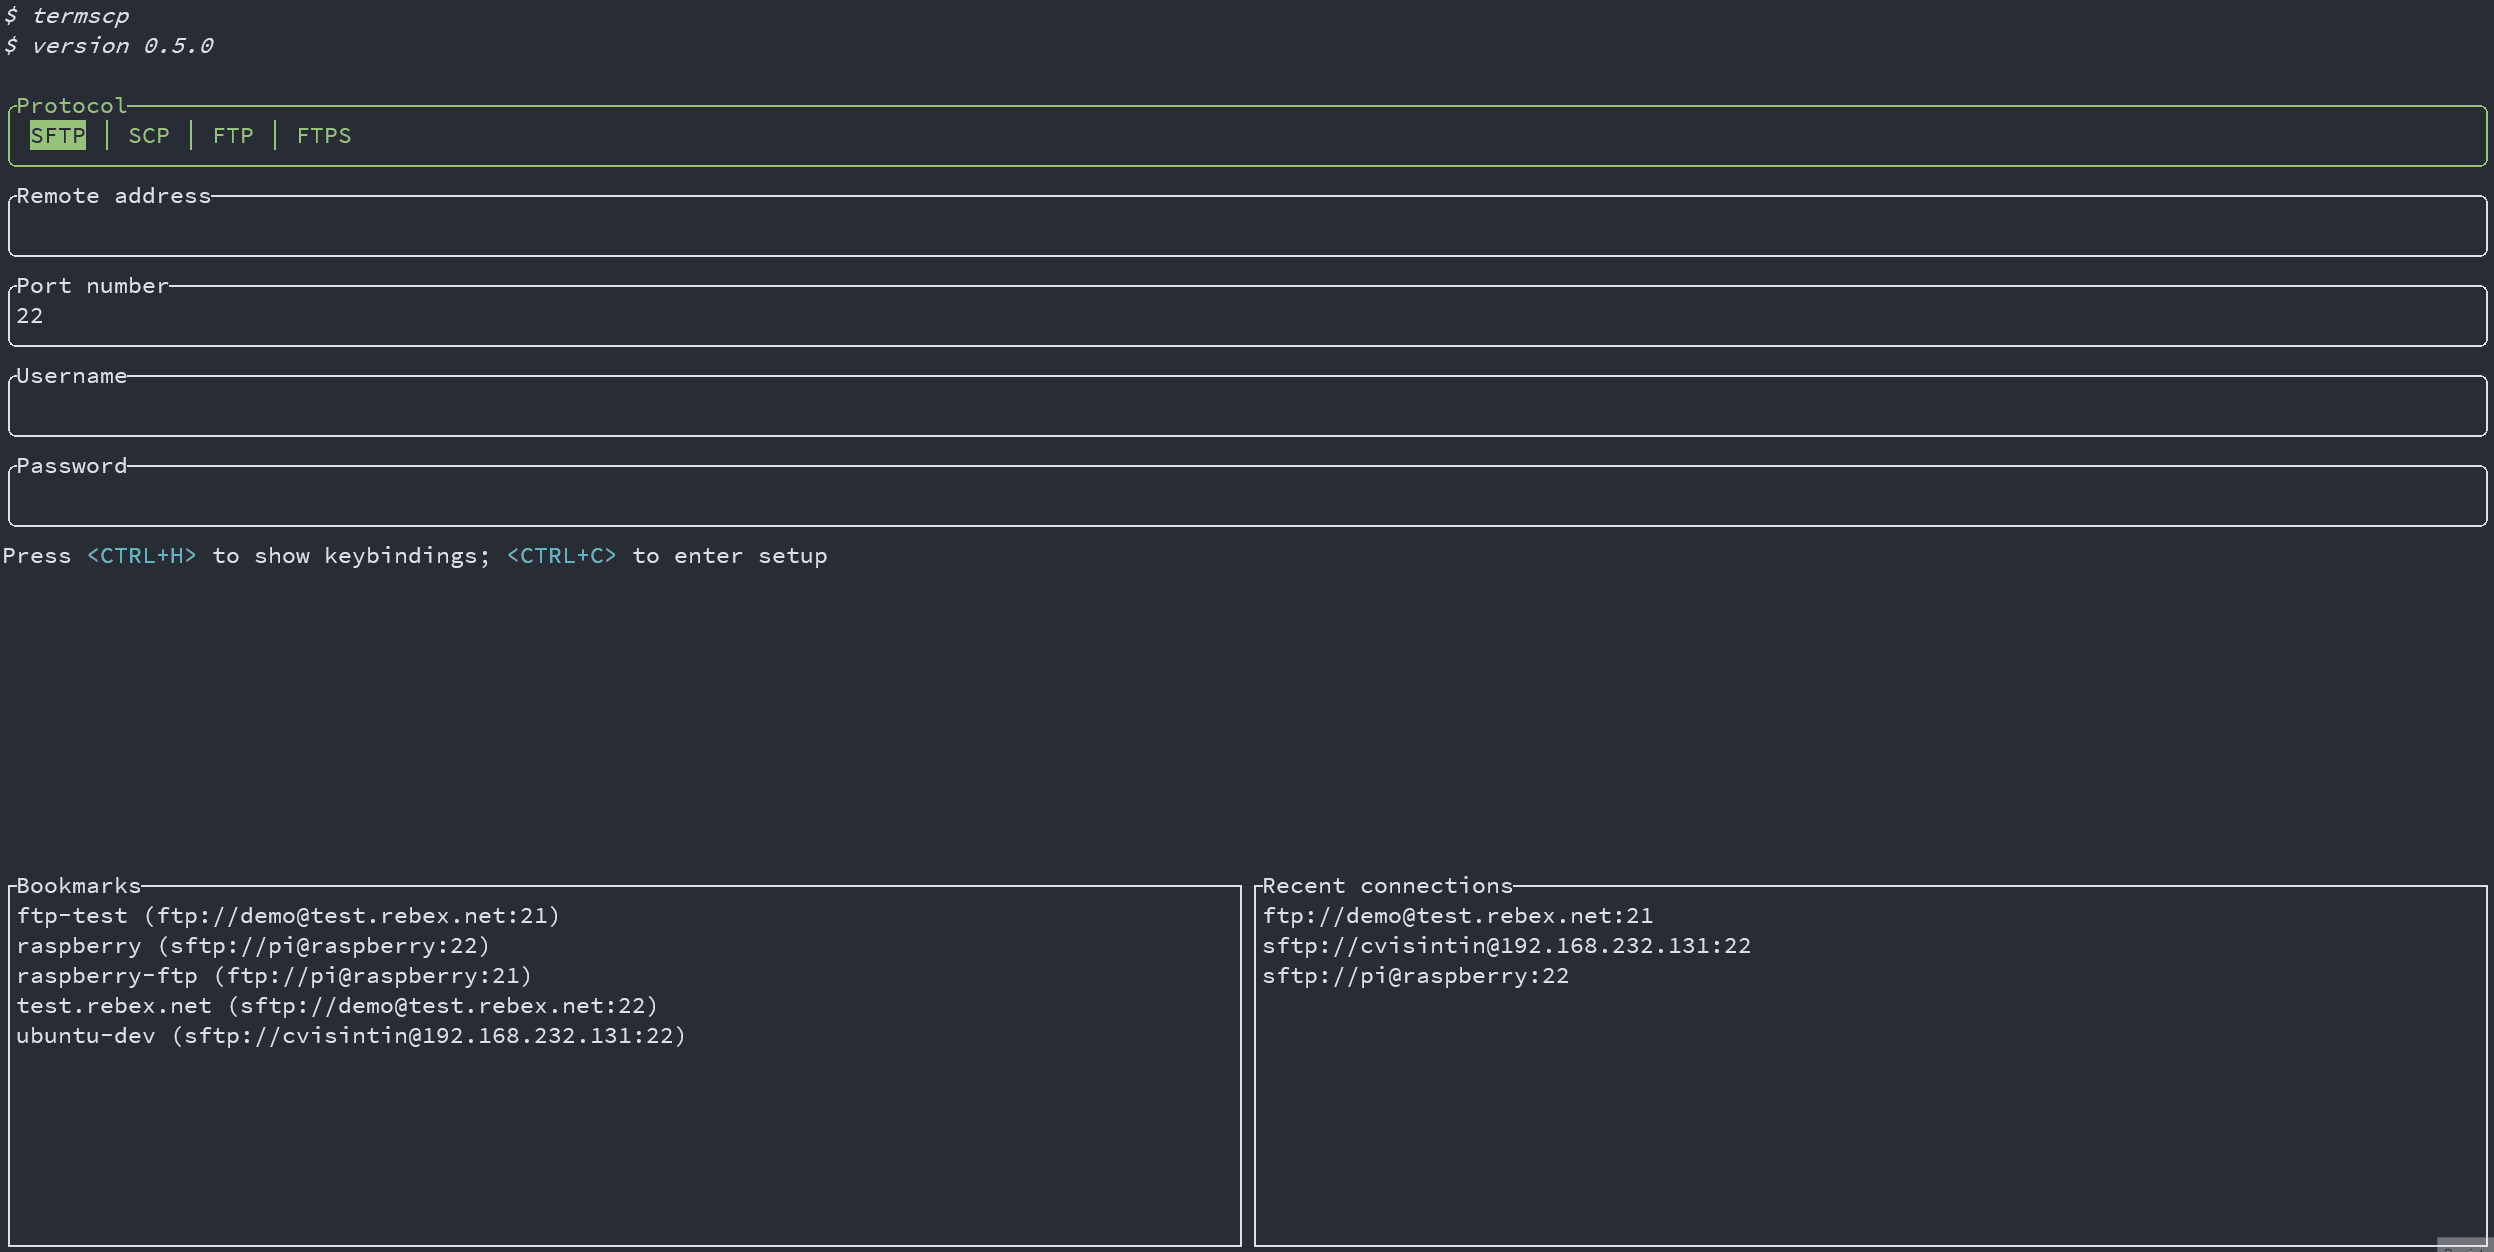
termscp can be started in two different mode, if no extra arguments is provided, termscp will show the authentication form, where the user will be able to provide the parameters required to connect to the remote peer.
Alternatively, the user can provide an address as argument to skip the authentication form and starting directly the connection to the remote server.
If address argument is provided you can also provide the start working directory for local host
Address argument 🌎
The address argument has the following syntax:
[protocol://][username@]<address>[:port][:wrkdir]
Let's see some example of this particular syntax, since it's very comfortable and you'll probably going to use this instead of the other one...
-
Connect using default protocol (defined in configuration) to 192.168.1.31, port if not provided is default for the selected protocol (in this case depends on your configuration); username is current user's name
termscp 192.168.1.31 -
Connect using default protocol (defined in configuration) to 192.168.1.31; username is
roottermscp root@192.168.1.31 -
Connect using scp to 192.168.1.31, port is 4022; username is
omartermscp scp://omar@192.168.1.31:4022 -
Connect using scp to 192.168.1.31, port is 4022; username is
omar. You will start in directory/tmptermscp scp://omar@192.168.1.31:4022:/tmp
AWS S3 address argument
Aws S3 has a different syntax for CLI address argument, for obvious reasons, but I managed to keep it the more similar as possible to the generic address argument:
s3://<bucket-name>@<region>[:profile][:/wrkdir]
e.g.
s3://buckethead@eu-central-1:default:/assets
How Password can be provided 🔐
You have probably noticed, that, when providing the address as argument, there's no way to provide the password. Password can be basically provided through 3 ways when address argument is provided:
-P, --passwordoption: just use this CLI option providing the password. I strongly unrecommend this method, since it's very insecure (since you might keep the password in the shell history)- Via
sshpass: you can provide password viasshpass, e.g.sshpass -f ~/.ssh/topsecret.key termscp cvisintin@192.168.1.31 - You will be prompted for it: if you don't use any of the previous methods, you will be prompted for the password, as happens with the more classics tools such as
scp,ssh, etc.
Aws S3 credentials 🦊
In order to connect to an Aws S3 bucket you must obviously provide some credentials. There are basically two ways to achieve this, and as you've probably already noticed you can't do that via the authentication form. So these are the ways you can provide the credentials for s3:
-
Use your credentials file: just configure the AWS cli via
aws configureand your credentials should already be located at~/.aws/credentials. In case you're using a profile different fromdefault, just provide it in the profile field in the authentication form. -
Environment variables: you can always provide your credentials as environment variables. Keep in mind that these credentials will always override the credentials located in the
credentialsfile. See how to configure the environment below:These should always be mandatory:
AWS_ACCESS_KEY_ID: aws access key ID (usually starts withAKIA...)AWS_SECRET_ACCESS_KEY: the secret access key
In case you've configured a stronger security, you may require these too:
AWS_SECURITY_TOKEN: security tokenAWS_SESSION_TOKEN: session token
⚠️ Your credentials are safe: termscp won't manipulate these values directly! Your credentials are directly consumed by the s3 crate. In case you've got some concern regarding security, please contact the library author on Github ⚠️
File explorer 📂
When we refer to file explorers in termscp, we refer to the panels you can see after establishing a connection with the remote. These panels are basically 3 (yes, three actually):
- Local explorer panel: it is displayed on the left of your screen and shows the current directory entries for localhost
- Remote explorer panel: it is displayed on the right of your screen and shows the current directory entries for the remote host.
- Find results panel: depending on where you're searching for files (local/remote) it will replace the local or the explorer panel. This panel shows the entries matching the search query you performed.
In order to change panel you need to type <LEFT> to move the remote explorer panel and <RIGHT> to move back to the local explorer panel. Whenever you are in the find results panel, you need to press <ESC> to exit panel and go back to the previous panel.
Keybindings ⌨
| Key | Command | Reminder |
|---|---|---|
<ESC> |
Disconnect from remote; return to authentication page | |
<TAB> |
Switch between log tab and explorer | |
<BACKSPACE> |
Go to previous directory in stack | |
<RIGHT> |
Move to remote explorer tab | |
<LEFT> |
Move to local explorer tab | |
<UP> |
Move up in selected list | |
<DOWN> |
Move down in selected list | |
<PGUP> |
Move up in selected list by 8 rows | |
<PGDOWN> |
Move down in selected list by 8 rows | |
<ENTER> |
Enter directory | |
<SPACE> |
Upload / download selected file | |
<A> |
Toggle hidden files | All |
<B> |
Sort files by | Bubblesort? |
<C> |
Copy file/directory | Copy |
<D> |
Make directory | Directory |
<E> |
Delete file (Same as DEL) |
Erase |
<F> |
Search for files (wild match is supported) | Find |
<G> |
Go to supplied path | Go to |
<H> |
Show help | Help |
<I> |
Show info about selected file or directory | Info |
<L> |
Reload current directory's content / Clear selection | List |
<M> |
Select a file | Mark |
<N> |
Create new file with provided name | New |
<O> |
Edit file; see Text editor | Open |
<Q> |
Quit termscp | Quit |
<R> |
Rename file | Rename |
<S> |
Save file as... | Save |
<U> |
Go to parent directory | Upper |
<V> |
Open file with default program for filetype | View |
<W> |
Open file with provided program | With |
<X> |
Execute a command | eXecute |
<Y> |
Toggle synchronized browsing | sYnc |
<DEL> |
Delete file | |
<CTRL+A> |
Select all files | |
<CTRL+C> |
Abort file transfer process |
Work on multiple files 🥷
You can opt to work on multiple files, selecting them pressing <M>, in order to select the current file, or pressing <CTRL+A>, which will select all the files in the working directory.
Once a file is marked for selection, it will be displayed with a * on the left.
When working on selection, only selected file will be processed for actions, while the current highlighted item will be ignored.
It is possible to work on multiple files also when in the find result panel.
All the actions are available when working with multiple files, but be aware that some actions work in a slightly different way. Let's dive in:
- Copy: whenever you copy a file, you'll be prompted to insert the destination name. When working with multiple file, this name refers to the destination directory where all these files will be copied.
- Rename: same as copy, but will move files there.
- Save as: same as copy, but will write them there.
Synchronized browsing ⏲️
When enabled, synchronized browsing, will allow you to synchronize the navigation between the two panels.
This means that whenever you'll change the working directory on one panel, the same action will be reproduced on the other panel. If you want to enable synchronized browsing just press <Y>; press twice to disable. While enabled, the synchronized browsing state will be reported on the status bar on ON.
❗ at the moment, whenever you try to access an unexisting directory, you won't be prompted to create it. This might change in a future update.
Open and Open With 🚪
Open and open with commands are powered by open-rs.
When opening files with View command (<V>), the system default application for the file type will be used. To do so, the default operting system service will be used, so be sure to have at least one of these installed on your system:
- Windows users: you don't have to worry about it, since the crate will use the
startcommand. - MacOS users: you don't have to worry either, since the crate will use
open, which is already installed on your system. - Linux users: one of these should be installed
- xdg-open
- gio
- gnome-open
- kde-open
- WSL users: wslview is required, you must install wslu.
Q: Can I edit remote files using the view command?
A: No, at least not directly from the "remote panel". You have to download it to a local directory first, that's due to the fact that when you open a remote file, the file is downloaded into a temporary directory, but there's no way to create a watcher for the file to check when the program you used to open it was closed, so termscp is not able to know when you're done editing the file.
Bookmarks ⭐
In termscp it is possible to save favourites hosts, which can be then loaded quickly from the main layout of termscp. termscp will also save the last 16 hosts you connected to. This feature allows you to load all the parameters required to connect to a certain remote, simply selecting the bookmark in the tab under the authentication form.
Bookmarks will be saved, if possible at:
$HOME/.config/termscp/on Linux/BSD$HOME/Library/Application Support/termscpon MacOsFOLDERID_RoamingAppData\termscp\on Windows
For bookmarks only (this won't apply to recent hosts) it is also possible to save the password used to authenticate. The password is not saved by default and must be specified through the prompt when saving a new Bookmark. If you're concerned about the security of the password saved for your bookmarks, please read the chapter below 👀.
In order to create a new bookmark, just follow these steps:
- Type in the authentication form the parameters to connect to your remote server
- Press
<CTRL+S> - Type in the name you want to give to the bookmark
- Choose whether to remind the password or not
- Press
<ENTER>to submit
whenever you want to use the previously saved connection, just press <TAB> to navigate to the bookmarks list and load the bookmark parameters into the form pressing <ENTER>.
Are my passwords Safe 😈
Sure 😉. As said before, bookmarks are saved in your configuration directory along with passwords. Passwords are obviously not plain text, they are encrypted with AES-128. Does this make them safe? Absolutely! (except for BSD and WSL users 😢)
On Windows, Linux and MacOS the key used to encrypt passwords is stored, if possible (but should be), respectively in the Windows Vault, in the system keyring and into the Keychain. This is actually super-safe and is directly managed by your operating system.
❗ Please, notice that if you're a Linux user, you'd better to read the chapter below 👀, because the keyring might not be enabled or supported on your system!
On BSD and WSL, on the other hand, the key used to encrypt your passwords is stored on your drive (at $HOME/.config/termscp). It is then, still possible to retrieve the key to decrypt passwords. Luckily, the location of the key guarantees your key can't be read by users different from yours, but yeah, I still wouldn't save the password for a server exposed on the internet 😉.
Linux Keyring
We all love Linux thanks to the freedom it gives to the users. You can basically do anything you want as a Linux user, but this has also some cons, such as the fact that often there is no standard applications across different distributions. And this involves keyring too.
This means that on Linux there might be no keyring installed on your system. Unfortunately the library we use to work with the key storage requires a service which exposes org.freedesktop.secrets on D-BUS and the worst fact is that there only two services exposing it.
- ❗ If you use GNOME as desktop environment (e.g. ubuntu users), you should already be fine, since keyring is already provided by
gnome-keyringand everything should already be working. - ❗ For other desktop environment users there is a nice program you can use to get a keyring which is KeepassXC, which I use on my Manjaro installation (with KDE) and works fine. The only problem is that you have to setup it to be used along with termscp (but it's quite simple). To get started with KeepassXC read more here.
- ❗ What about you don't want to install any of these services? Well, there's no problem! termscp will keep working as usual, but it will save the key in a file, as it usually does for BSD and WSL.
KeepassXC setup for termscp
Follow these steps in order to setup keepassXC for termscp:
- Install KeepassXC
- Go to "tools" > "settings" in toolbar
- Select "Secret service integration" and toggle "Enable KeepassXC freedesktop.org secret service integration"
- Create a database, if you don't have one yet: from toolbar "Database" > "New database"
- From toolbar: "Database" > "Database settings"
- Select "Secret service integration" and toggle "Expose entries under this group"
- Select the group in the list where you want the termscp secret to be kept. Remember that this group might be used by any other application to store secrets via DBUS.
Configuration ⚙️
termscp supports some user defined parameters, which can be defined in the configuration. Underhood termscp has a TOML file and some other directories where all the parameters will be saved, but don't worry, you won't touch any of these files manually, since I made possible to configure termscp from its user interface entirely.
termscp, like for bookmarks, just requires to have these paths accessible:
$HOME/.config/termscp/on Linux/BSD$HOME/Library/Application Support/termscpon MacOsFOLDERID_RoamingAppData\termscp\on Windows
To access configuration, you just have to press <CTRL+C> from the home of termscp.
These parameters can be changed:
- Text Editor: the text editor to use. By default termscp will find the default editor for you; with this option you can force an editor to be used (e.g.
vim). Also GUI editors are supported, unless theynohupfrom the parent process. - Default Protocol: the default protocol is the default value for the file transfer protocol to be used in termscp. This applies for the login page and for the address CLI argument.
- Show Hidden Files: select whether hidden files shall be displayed by default. You will be able to decide whether to show or not hidden files at runtime pressing
Aanyway. - Check for updates: if set to
yes, termscp will fetch the Github API to check if there is a new version of termscp available. - Prompt when replacing existing files?: If set to
yes, termscp will prompt for confirmation you whenever a file transfer would cause an existing file on target host to be replaced. - Group Dirs: select whether directories should be groupped or not in file explorers. If
Display firstis selected, directories will be sorted using the configured method but displayed before files, viceversa ifDisplay lastis selected. - Remote File formatter syntax: syntax to display file info for each file in the remote explorer. See File explorer format
- Local File formatter syntax: syntax to display file info for each file in the local explorer. See File explorer format
- Enable notifications?: If set to
Yes, notifications will be displayed. - Notifications: minimum transfer size: if transfer size is greater or equal than the specified value, notifications for transfer will be displayed. The accepted values are in format
{UNSIGNED} B/KB/MB/GB/TB/PB
SSH Key Storage 🔐
Along with configuration, termscp provides also an essential feature for SFTP/SCP clients: the SSH key storage.
You can access the SSH key storage, from configuration moving to the SSH Keys tab, once there you can:
- Add a new key: just press
<CTRL+N>and you will be prompted to create a new key. Provide the hostname/ip address and the username associated to the key and finally a text editor will open up: paste the PRIVATE ssh key into the text editor, save and quit. - Remove an existing key: just press
<DEL>or<CTRL+E>on the key you want to remove, to delete persistently the key from termscp. - Edit an existing key: just press
<ENTER>on the key you want to edit, to change the private key.
Q: Wait, my private key is protected with password, can I use it?
A: Of course you can. The password provided for authentication in termscp, is valid both for username/password authentication and for RSA key authentication.
File Explorer Format
It is possible through configuration to define a custom format for the file explorer. This is possible both for local and remote host, so you can have two different syntax in use. These fields, with name File formatter syntax (local) and File formatter syntax (remote) will define how the file entries will be displayed in the file explorer.
The syntax for the formatter is the following {KEY1}... {KEY2:LENGTH}... {KEY3:LENGTH:EXTRA} {KEYn}....
Each key in bracket will be replaced with the related attribute, while everything outside brackets will be left unchanged.
- The key name is mandatory and must be one of the keys below
- The length describes the length reserved to display the field. Static attributes doesn't support this (GROUP, PEX, SIZE, USER)
- Extra is supported only by some parameters and is an additional options. See keys to check if extra is supported.
These are the keys supported by the formatter:
ATIME: Last access time (with default syntax%b %d %Y %H:%M); Extra might be provided as the time syntax (e.g.{ATIME:8:%H:%M})CTIME: Creation time (with syntax%b %d %Y %H:%M); Extra might be provided as the time syntax (e.g.{CTIME:8:%H:%M})GROUP: Owner groupMTIME: Last change time (with syntax%b %d %Y %H:%M); Extra might be provided as the time syntax (e.g.{MTIME:8:%H:%M})NAME: File name (Elided if longer than LENGTH)PEX: File permissions (UNIX format)SIZE: File size (omitted for directories)SYMLINK: Symlink (if any-> {FILE_PATH})USER: Owner user
If left empty, the default formatter syntax will be used: {NAME:24} {PEX} {USER} {SIZE} {MTIME:17:%b %d %Y %H:%M}
Themes 🎨
Termscp provides you with an awesome feature: the possibility to set the colors for several components in the application. If you want to customize termscp there are two available ways to do so:
- From the configuration menu
- Importing a theme file
In order to create your own customization from termscp, all you have to do so is to enter the configuration from the auth activity, pressing <CTRL+C> and then <TAB> twice. You should have now moved to the themes panel.
Here you can move with <UP> and <DOWN> to change the style you want to change, as shown in the gif below:
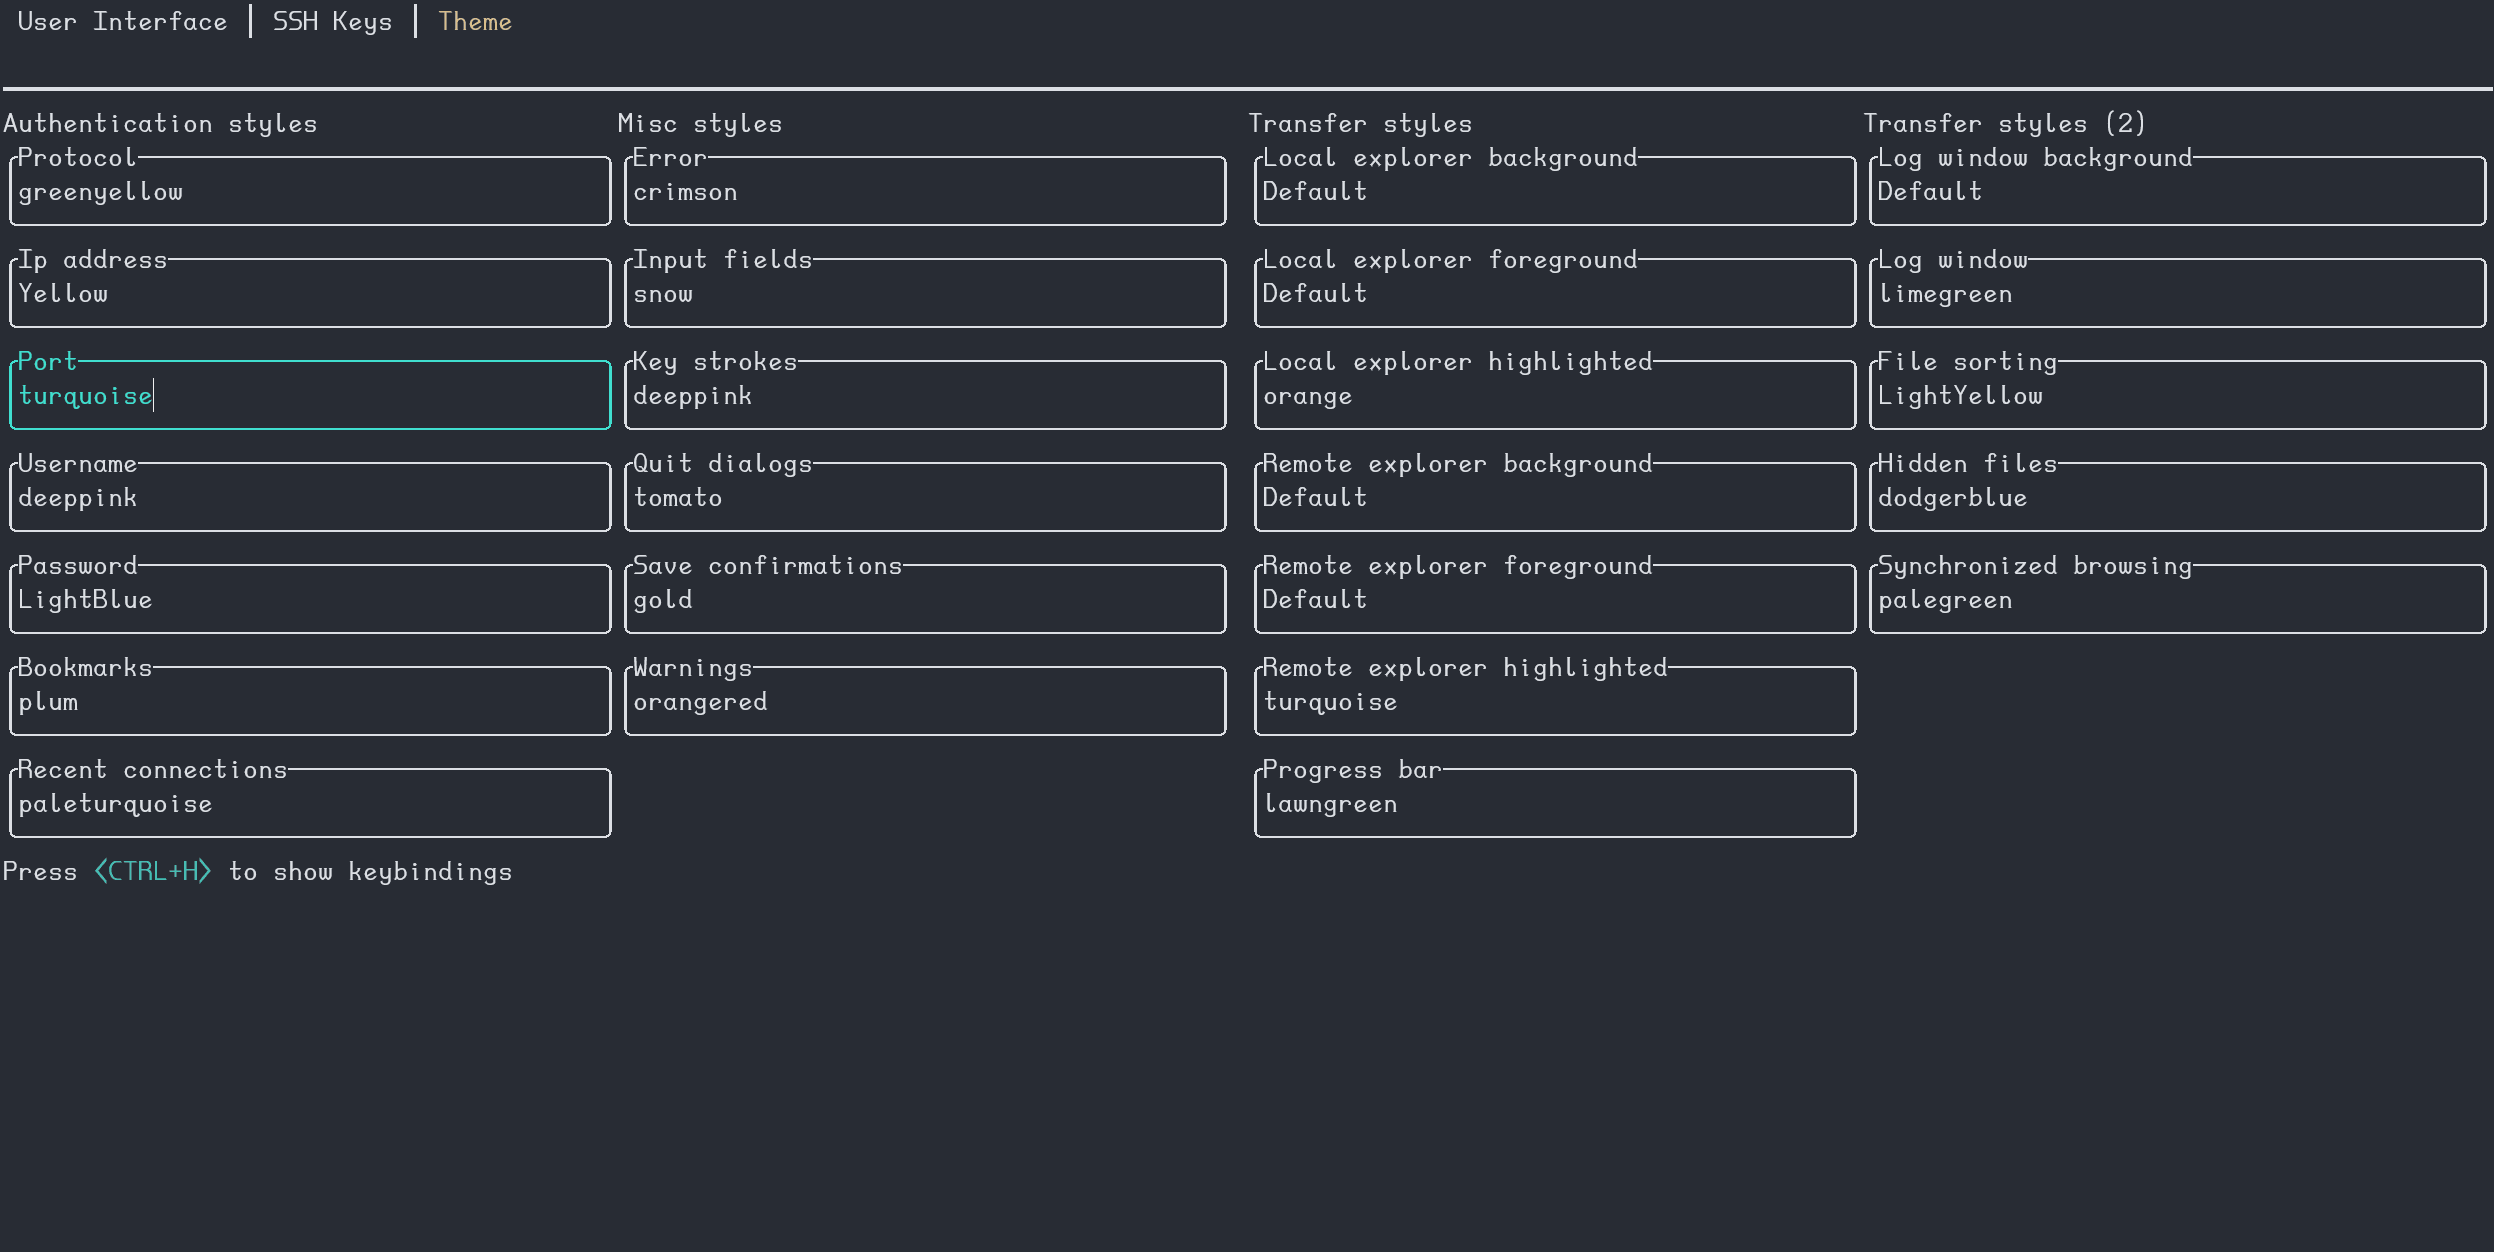
termscp supports both the traditional explicit hex (#rrggbb) and rgb rgb(r, g, b) syntax to provide colors, but also css colors (such as crimson) are accepted 😉. There is also a special keywork which is Default. Default means that the color used will be the default foreground or background color based on the situation (foreground for texts and lines, background for well, guess what).
As said before, you can also import theme files. You can take inspiration from or directly use one of the themes provided along with termscp, located in the themes/ directory of this repository and import them running termscp as termscp -t <theme_file>. If everything was fine, it should tell you the theme has successfully been imported.
My theme won't load 😱
This is probably due to a recent update which has broken the theme. Whenever I add a new key to themes, the saved theme won't load. To fix this issues there are two really quick-fix solutions:
-
Reload theme: whenever I release an update I will also patch the "official" themes, so you just have to download it from the repository again and re-import the theme via
-toptiontermscp -t <theme.toml> -
Fix your theme: If you're using a custom theme, then you can edit via
vimand add the missing key. The theme is located at$CONFIG_DIR/termscp/theme.tomlwhere$CONFIG_DIRis:- FreeBSD/GNU-Linux:
$HOME/.config/ - MacOs:
$HOME/Library/Application Support - Windows:
%appdata%
❗ Missing keys are reported in the CHANGELOG under
BREAKING CHANGESfor the version you've just installed. - FreeBSD/GNU-Linux:
Styles 💈
You can find in the table below, the description for each style field. Please, notice that styles won't apply to configuration page, in order to make it always accessible in case you mess everything up
Authentication page
| Key | Description |
|---|---|
| auth_address | Color of the input field for IP address |
| auth_bookmarks | Color of the bookmarks panel |
| auth_password | Color of the input field for password |
| auth_port | Color of the input field for port number |
| auth_protocol | Color of the radio group for protocol |
| auth_recents | Color of the recents panel |
| auth_username | Color of the input field for username |
Transfer page
| Key | Description |
|---|---|
| transfer_local_explorer_background | Background color of localhost explorer |
| transfer_local_explorer_foreground | Foreground color of localhost explorer |
| transfer_local_explorer_highlighted | Border and highlighted color for localhost explorer |
| transfer_remote_explorer_background | Background color of remote explorer |
| transfer_remote_explorer_foreground | Foreground color of remote explorer |
| transfer_remote_explorer_highlighted | Border and highlighted color for remote explorer |
| transfer_log_background | Background color for log panel |
| transfer_log_window | Window color for log panel |
| transfer_progress_bar_partial | Partial progress bar color |
| transfer_progress_bar_total | Total progress bar color |
| transfer_status_hidden | Color for status bar "hidden" label |
| transfer_status_sorting | Color for status bar "sorting" label; applies also to file sorting dialog |
| transfer_status_sync_browsing | Color for status bar "sync browsing" label |
Misc
These styles applie to different part of the application.
| Key | Description |
|---|---|
| misc_error_dialog | Color for error messages |
| misc_info_dialog | Color for info dialogs |
| misc_input_dialog | Color for input dialogs (such as copy file) |
| misc_keys | Color of text for key strokes |
| misc_quit_dialog | Color for quit dialogs |
| misc_save_dialog | Color for save dialogs |
| misc_warn_dialog | Color for warn dialogs |
Text Editor ✏
termscp has, as you might have noticed, many features, one of these is the possibility to view and edit text file. It doesn't matter if the file is located on the local host or on the remote host, termscp provides the possibility to open a file in your favourite text editor. In case the file is located on remote host, the file will be first downloaded into your temporary file directory and then, only if changes were made to the file, re-uploaded to the remote host. termscp checks if you made changes to the file verifying the last modification time of the file.
❗ Just a reminder: you can edit only textual file; binary files are not supported.
Logging 🩺
termscp writes a log file for each session, which is written at
$HOME/.config/termscp/termscp.logon Linux/BSD$HOME/Library/Application Support/termscp/termscp.logon MacOsFOLDERID_RoamingAppData\termscp\termscp.logon Windows
the log won't be rotated, but will just be truncated after each launch of termscp, so if you want to report an issue and you want to attach your log file, keep in mind to save the log file in a safe place before using termscp again. The log file always reports in trace level, so it is kinda verbose. I know you might have some questions regarding log files, so I made a kind of a Q/A:
Is it possible to reduce verbosity?
No. The reason is quite simple: when an issue happens, you must be able to know what's causing it and the only way to do that, is to have the log file with the maximum verbosity level set.
If trace level is set for logging, is the file going to reach a huge size?
Probably not, unless you never quit termscp, but I think that's unlikely to happen. A long session may produce up to 10MB of log files (I said a long session), but I think a normal session won't exceed 2MB.
I don't want logging, can I turn it off?
Yes, you can. Just start termscp with -q or --quiet option. You can alias termscp to make it persistent. Remember that logging is used to diagnose issues, so since behind every open source project, there should always be this kind of mutual help, keeping log files might be your way to support the project 😉. I don't want you to feel guilty, but just to say.
Is logging safe?
If you're concerned about security, the log file doesn't contain any plain password, so don't worry and exposes the same information the sibling file bookmarks reports.
Notifications 📫
Termscp will send Desktop notifications for these kind of events:
- on Transfer completed: The notification will be sent once a transfer has been successfully completed.
- ❗ The notification will be displayed only if the transfer total size is at least the specified
Notifications: minimum transfer sizein the configuration.
- ❗ The notification will be displayed only if the transfer total size is at least the specified
- on Transfer failed: The notification will be sent once a transfer has failed due to an error.
- ❗ The notification will be displayed only if the transfer total size is at least the specified
Notifications: minimum transfer sizein the configuration.
- ❗ The notification will be displayed only if the transfer total size is at least the specified
- on Update available: Whenever a new version of termscp is available, a notification will be displayed.
- on Update installed: Whenever a new version of termscp has been installed, a notification will be displayed.
- on Update failed: Whenever the installation of the update fails, a notification will be displayed.
❗ If you prefer to keep notifications turned off, you can just enter setup and set Enable notifications? to No 😉.
❗ If you want to change the minimum transfer size to display notifications, you can change the value in the configuration with key Notifications: minimum transfer size and set it to whatever suits better for you 🙂.